Friday, August 26, 2011

Better for You Blueberry-Almond Crumb Bars

Awhile ago, when I was still blogging on Yumology, I made some Whole-Wheat Blueberry Crumb Bars. Well, just when I didn't think I could make them better-- I did!

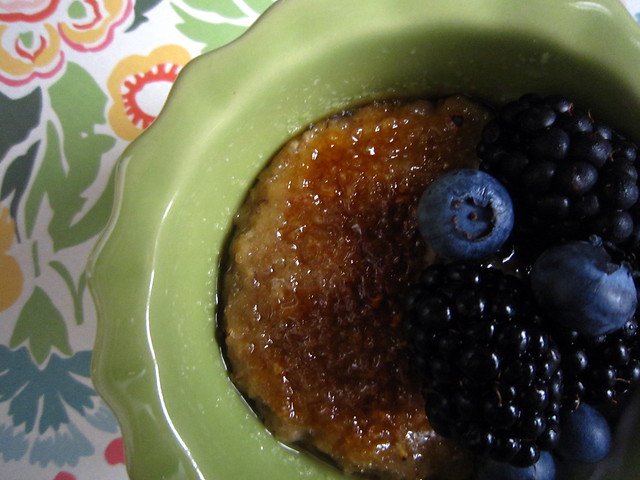
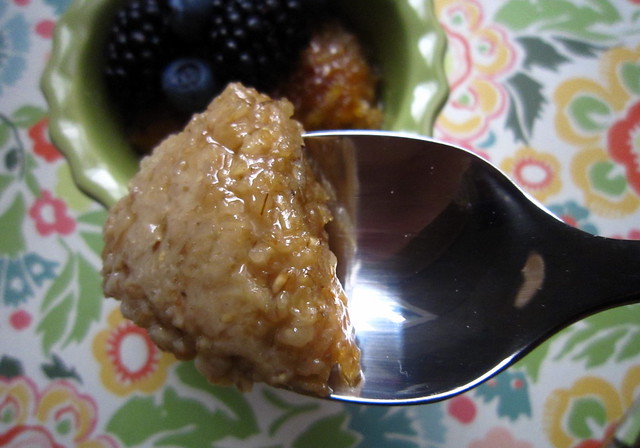
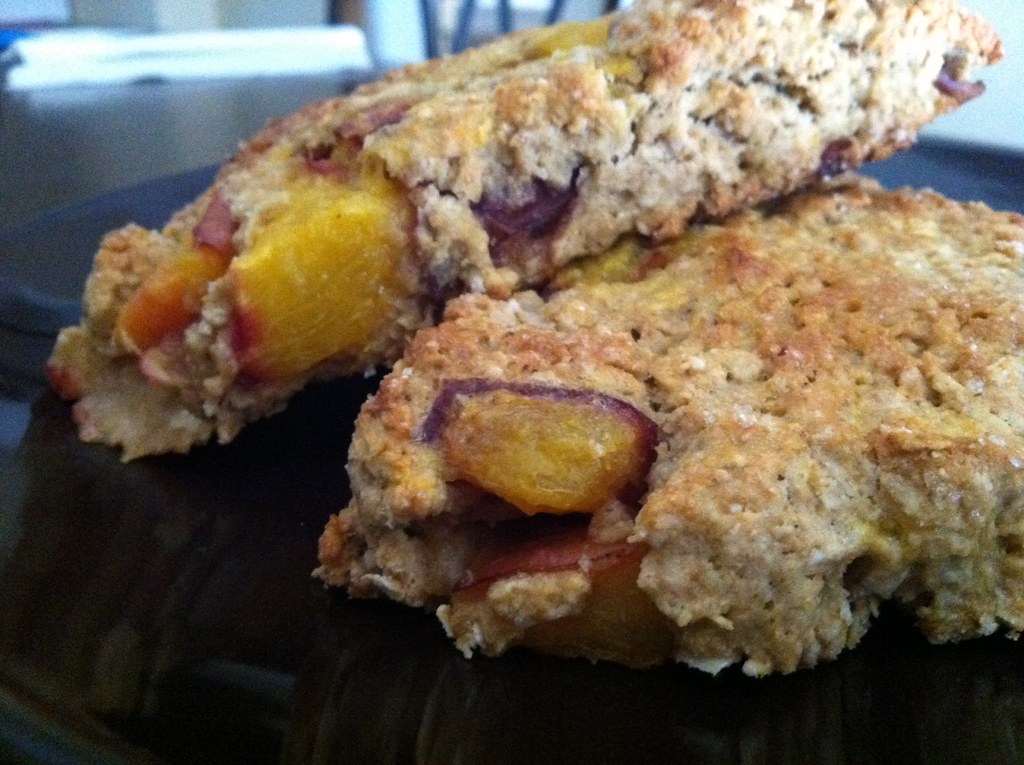
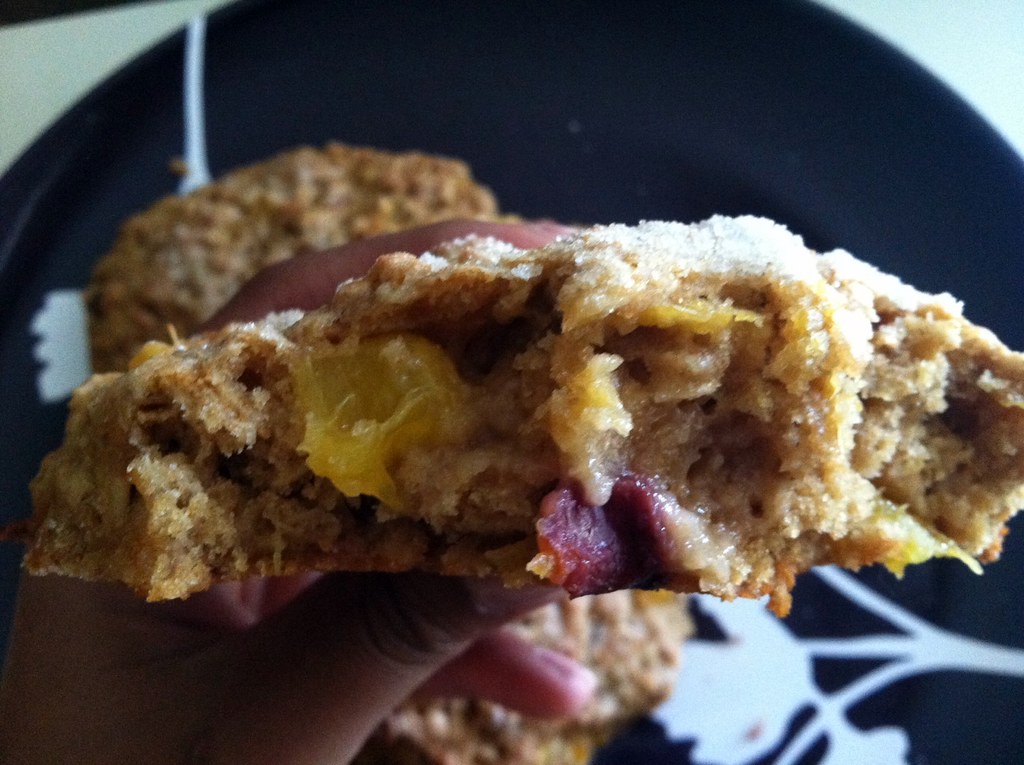
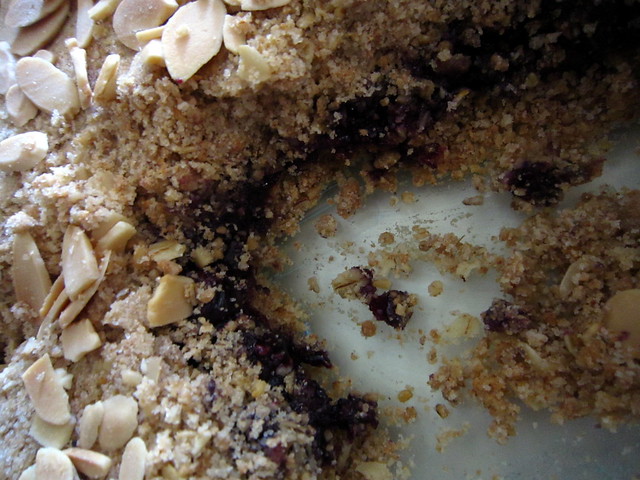
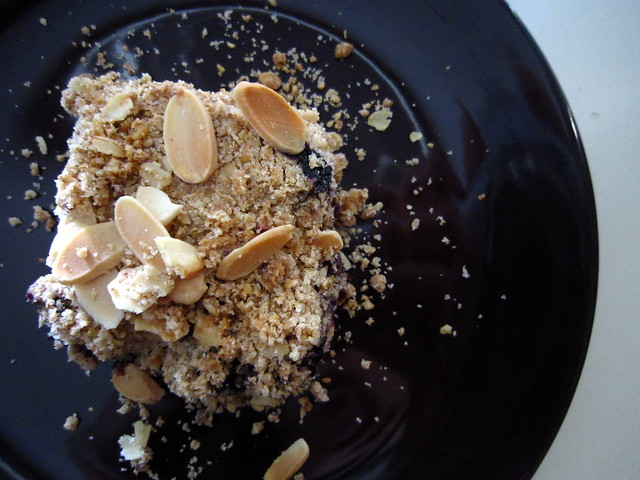
These crumb bars contain everything good for you and are mom (and tummy) approved. I loaded these with fantastic grains including whole-wheat, steel cut oats, and old fashioned oats. These ingredients make for a very filling bar that is great for a snack, breakfast, and/or dessert. Additionally, instead of a ton of butter, I used just a tad and used almond butter with flax seed to help attain the crumbly shortbread texture. Adding almond butter was such a great decision-- my belly told me so! These bars have a perfectly balanced flavor blend of delightfully sweet berries and wholesome almond butter and definitely channel memories of P.B. and J. lunches from my childhood with every bite.


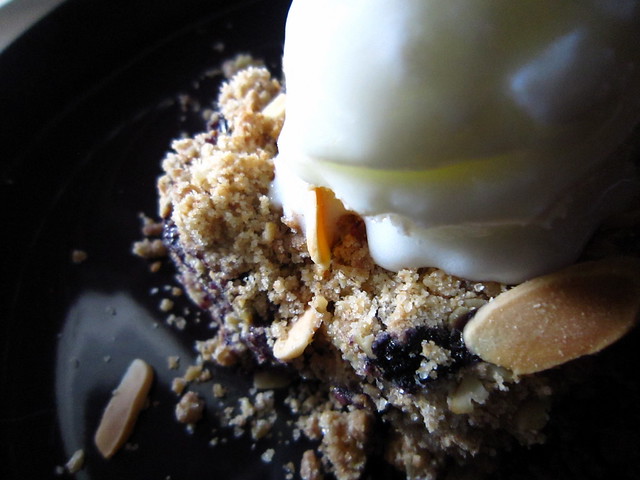
Here I added a little scoop of coconut fro-yo...it was delish!


Better for You Blueberry-Almond Crumb Bars
makes 12-16 2-3" squares

1 1/2 cup whole wheat flour
1 cup quick cooking steel cut oats
1/2 cup old fashioned oats
1/2 tsp salt
1 cup organic white sugar (divided use)
1/2 tsp baking soda
5 tbsp cold butter, cut into cubes
1/2 cup almond butter
2 cups fresh blueberries
1/4 cup honey
2 tbsp lemon juice
2 tbsp cornstarch
additional sliced almonds.

Preheat oven to 375 degrees F.

1. In a food processor, pulse together the whole wheat flour, steel cut oats, old fashioned oats, salt, 3/4 cup of organic white sugar, and baking soda. Add the cold butter and pulse a few times. Add the almond butter and pulse the mixture again until a coarse crumbly texture with pea-sized balls of dough is achieved. Reserve 2 cups of the mixture for later and pour the rest into an lightly greased 8x8" baking dish. Pat down and compact the mixture well into the dish. Set aside.

2. In a medium-small sauce pot, stir together the blueberries, honey, remaining 1/4 cup organic white sugar, and lemon juice. Bring the mixture to a simmer and continue to cook on medium-low heat until the berries break down and the sugars are well dissolved. Add the cornstarch and continue to cook and stir until the mixture becomes quite thick. Turn off the heat and pour it all on top of the prepared crust; use a spatula to gently spread the blueberry mixture evenly around the dish. Evenly top with the remaining crumb mixture; pat down well when finished. Sprinkle additional sliced almonds on top, if desired.

3. Bake in the oven on the middle rack for 25-30 minutes. Crust should be golden brown. Allow the baked crumb bars to cool for 10-20 minutes for easier cutting and serving-- bars will be very crumbly regardless, but will fall apart less if you wait a bit before chowing down. :)

Thursday, August 25, 2011

Wear What You Drink


Wear this darling Sky Stories Dress from Anthropologie (on sale now!) with cool and natural tones that will easily transition into fall with boots and a cardigan and drink this comforting Masala Chai Tea Latte from the velvet bird.

Tuesday, August 23, 2011

Tuesday Night Dinna'!

  • In my personal opinion, Cooking Light is a wonderful resource for delicious and healthy recipes. I often browse through their site and become inspired by some of their cookbooks that I own. This chicken recipe is a yum-dum-diggity variation of Cooking Light's Crunchy Shrimp with Toasted Couscous and Orange Ginger Sauce. If you're looking for an easy recipe that allows you to work with a variety of protein options, I highly recommend this one. Although it calls for shrimp, I have found that chicken and fish are also great friends. However, if you do decide to use fish, I suggest opting out of cutting your fillets into pieces and either pan-searing or roasting them. 
Now, enough reading--more eating!


  • Crunchy Chicken with Toasted Whole-Wheat Couscous and Orange Ginger Sauce
  • *adapted from here 
  • serves 4

  • Sauce:
  • 1 cup orange juice
  • 1 tablespoon chopped fresh cilantro
  • 2 tablespoons reduced-fat mayonnaise
  • 1 1/2 tablespoons fat-free, less-sodium chicken broth
  • 1 teaspoon grated peeled fresh ginger
  • 1 teaspoon fresh lime juice
  • 1/2 teaspoon ground cumin
  • 1/4 teaspoon salt
  • 1/4 teaspoon ground red pepper
  • Couscous:
  • 1 cup uncooked couscous
  • 1 1/2 cups fat-free, less-sodium chicken broth
  • 1/2 cup orange juice
  • 1/2 teaspoon salt
  • 1/3 cup chopped green onions
  • 2 tablespoons sliced almonds, toasted
  • 1 tablespoon unsalted butter
  • Chicken:
  • 3/4 - 1 lb uncooked chicken breast, cut into bite-size chunks
  • large egg white, lightly beaten
  • 1/2 cup panko (Japanese breadcrumbs)
  • 1 teaspoon chopped fresh cilantro
  • 1/2 teaspoon grated peeled fresh ginger
  • 1/8 teaspoon freshly ground black pepper
  • 1 tablespoon canola oil

  • 1. To prepare sauce, bring 1 cup orange juice to a boil in a small saucepan over medium-high heat; cook until reduced to 1/4 cup (about 10 minutes). Remove from heat; cool completely. Stir in 1 tablespoon cilantro and next 7 ingredients (through red pepper); set aside.
  • 2. To prepare couscous, place couscous in a large nonstick skillet over medium-high heat; cook 3 minutes or until toasted, stirring constantly. Add 1 1/2 cups broth, 1/2 cup orange juice, and 1/2 teaspoon salt; bring to a boil. Remove from heat; cover and let stand 5 minutes. Fluff with a fork; add onions, almonds, and butter, stirring until butter melts. Keep warm.
  • 3. To prepare chicken, combine chicken and egg white in a large bowl, tossing to coat. Combine the panko, 1 teaspoon cilantro, 1/2 teaspoon ginger, and black pepper in a large zip-top plastic bag. Add shrimp to the bag, and seal and shake to coat.
  • 4. Heat oil in a large nonstick skillet over medium-high heat; arrange shrimp in a single layer in pan. Cook 2 minutes on each side or until done.
  • 5. Place 3/4 cup couscous on each of 4 plates; top each with a portion of chicken. Drizzle each with 1 1/2 tablespoons sauce. Garnish with extra almonds and cilantro, if desired.

Saturday, August 20, 2011

Brûléed Steel Cut Oatmeal

Oatmeal is my life saver. It's my one of my favorite breakfast items when I want something satisfying yet healthy. Eating it in the morning keeps me full and ready for my day. I love inviting brown sugar, dried fruit, nuts, and other yummy friends to the party-- mix and mingle them together and I'm usually good to go. 

Today I opted for something a little more special and whipped out my torch for an "Oatmeal alla Amelie" breakfast. However, I have to admit that my bruleed oatmeal was so perfectly sweet and delicious, I almost felt like I was eating dessert. Dessert for breakfast? And, it's good for you??

At this point, it's okay if you're squealing with joy. I promise. I'm still squealing.


Brûléed Steel Cut Oatmeal
serves 4
*Steel cut oats are heartier and nuttier. Regular oats just won't hold up with this recipe. I use a quick cooking steel cut oatmeal here-- takes much less time to cook than the regular kind (which is about 30 minutes). Either kind of steel cut oats will do.


1 1/2 cups of water
1 1/2 cups of fat free milk
1/4 tsp of salt
1 cup of quick cooking steel cut oats (I use one from Trader Joe's)
2 tsp real vanilla extract
3 1/2 tbsp dark brown sugar
Turbinado sugar


1. Combine the water, fat free milk, and salt in a large pot and bring to a boil. Add the steel cut oats, stir, and reduce the heat to medium-low. Allow the oats to cook for 5-7 minutes, stirring regularly. Oats should become very thick and creamy. During the last minute of cooking time, stir in the vanilla extract and dark brown sugar. Turn off the heat and portion the oatmeal out into ramekins. Allow to cool for about 1 minute.


2. Sprinkle the tops of the ramekins with Turbinado sugar-- be sure to make as much of an even layer as possible. Do not skimp on the sugar; if you don't sprinkle enough, it will be difficult to get a good "brûléed" crust.  An amount between 1/2-1 tbsp of sugar shall do, depending on the size of the ramekin. Use a kitchen torch to melt and caramelize the sugar until  a crispy-golden brown crust is formed.

Thursday, August 18, 2011

Two-Step Guide to Happiness

1. Get original and watermelon swirled Pinkberry yogurt with fruit and mochi in your hands. Don't forget the cup (amateur mistake).
2. Spoon Pinkberry into your mouth. Repeat this step over and over until you become overwhelmed with bliss due to exceptionally high levels of tart and fruity dairy satisfaction.


You'll thank me later.

Tuesday, August 16, 2011

Wear What You Eat

Inspired by Joy from ohjoy!, and her "this and that", I am going to regularly start featuring weekly "Wear What you Eat" posts. This simply combines some of my absolute favorite things-- beautiful clothes and delicious food.


Wear this adorable navy print dress by Beso (on sale now at shopbop!) and eat this summertime lovin' in your tums blackberry ice cream from Caleigh's Kitchen.


Monday, August 15, 2011

Margherita Monday


As I walked into staff lounge and copy room today at work, my nose immediately led my body towards one of the dining tables. Placed in the center stood a tall grocery bag with several towering stems of fresh basil. The scent was delightful and I was thrilled and so thankful that one of my colleagues decided to share some of their garden with everyone else. I can't rave enough about how much I love fresh basil! As I selected a few stems to take home with me, I discovered even more goodies! At the bottom of the bag lay homegrown Roma and baby Heirloom tomatoes. I squealed with delight as I collected a few, stacked my copies on top of my edible treasure, and maneuvered my way back to my classroom.

I originally had plans to make a simple sandwich for dinner, but did not want to let the fresh produce sit another day. Consequently, I decided to cook up a simple margherita pizza-- a perfect way to showcase delicious and quality ingredients; I planned on using my Roma tomatoes and basil (the baby Heirlooms will serve as great snacks later). For a "heartier" pizza, I added some thinly sliced imported prosciutto. Yum!

Margherita Pizza with Prosciutto
Makes one 14" pizza

Whole-wheat pizza dough (I cheated today and picked up some from my local grocery store ;) ). *You can always make it from scratch using the recipe I listed here in this recipe. However, the recipe is enough for two pizzas while I picked up an amount of dough for one 14" pizza.

3 Roma tomatoes
2 tbsp extra virgin olive oil
1 tsp minced garlic
1 tsp salt
1/2 tsp pepper
1 1/2 tsp sugar
1 tsp dried oregano

1/2 lb. fresh mozzarella, sliced about 1/4" thick
1/2 cup freshly chopped or julienned basil leaves
1/4 cup freshly grated Parmigiano-Reggiano cheese

Preheat the oven to 450 degrees F (temp. may vary depending on dough; see note above).

1. In a small-medium sauce pot, bring about 3-4 cups of water to a boil. Place the tomatoes into the water and allow them to cook for about 5 minutes. Turn off the heat, drain the tomatoes, and allow them to cool for a few minutes just until they are safe to handle. Gently peel off the skins and then coarsely chop the tomatoes; set aside. Dry off any water from the sauce pot and heat 1 tbsp of extra virgin olive oil. Once heated, add the minced garlic and cook for about a minute. Add the chopped tomatoes, salt, pepper, sugar, and oregano; cook for about 10 minutes on medium-low, stirring often. Allow the sauce to simmer and cook until all the flavors blend together. Turn off the heat and set the sauce  aside.

2. When the dough has been prepped and is ready for baking, place it on a lightly floured surface and create a 12-14" round/shape. Place it on a lined or lightly greased and floured baking sheet/pizza stone. Brush the remaining 1 tbsp of olive oil over the surface and edges of the dough. Spread all of the sauce evenly on the dough, evenly top with mozzarella, sprinkle with the fresh basil (leave about 1 tbsp behind for later), gently place strips of prosciutto on top of the pizza, and finally sprinkle the freshly grated Parmigiano-Reggiano cheese over the pizza. Bake for about 10-15 minutes (or follow packaging instructions if using store-bought pizza).

3. Remove from oven, allow to cool slightly, and sprinkle with remaining basil. Eat up!

Friday, August 12, 2011

Our First Engagement Picture Session

My fiancé and are really excited that one of my students decided to help us out. She graciously provided us with our first engagement photo (picture).


I'm glad she caught us on a good hair day. Whew.

Wednesday, August 10, 2011

Whole Wheat Oat and Nectarine Scones

Here's the Million Dollar Question:

These scones are:
a) really good
b) really good for you
c) low in processed sugar
d) all of the above (with answer "a" x2)


The answer is "d". Oh, hello, breakfast. :)

Whole Wheat Oat and Nectarine Scones
Makes 6-8 

1 1/2 cups whole wheat flour
2 cups rolled oats (do not use instant oats)
1/2 tsp salt
4 tsp baking powder
2/3 cup dark brown sugar
1/2 cup unsalted butter, cold and cubed
1 large egg
1/3 cup half and half (I have used almond milk before, too)
1 1/2 tsp real vanilla extract
2 tbsp honey
1 1/2 cups ripe nectarines, pitted and diced
Turbinado sugar

Preheat the oven to 450 degrees F.

1. In a large bowl, sift and mix together the flour, oats, salt, baking powder, and sugar. Using a pastry knife, cut in the cold and cubed butter into the flour until the mixture is coarse and crumbly (crumbles should be about the size of peas).

2. In a small bowl, gently beat together the egg, half and half, vanilla, and honey. Make a well in the center of the dry ingredients and pour in the egg mixture. Use a rubber spatula to mix everything together just until it is all combined and there are no longer any "dry patches". Gently fold in the nectarines until they are well distributed. At this point, the mixture should be slightly wet.

3. Roll out the mixture onto a lightly floured surface and gently pat it together into a circle and press down until a height of about 3/4 inch is reached. Use a knife to cut the circle into sections to create wedges. If you have a scone cutter or would like to scoop the batter into less triangular shapes-- that will work, too.

4. Place the wedges about 3 inches apart on a lightly greased or lined baking sheet. Sprinkle the tops with Turbinado sugar and bake for 15 minutes, just until lightly golden brown. Remove from the oven, allow to rest for a few minutes, then transfer to a cooling rack.

These are best enjoyed the day of baking. You can store them in an airtight container, but the nectarines will emit moisture and the scones may lose their slightly crunchy exterior. 


Tuesday, August 9, 2011

Happy Birthday, Daddy


For all the piggy back rides, shoulders for me to sleep on, morning prayers together at the top of the stairs, endless car rides, meals on the table, donut runs, Grape Snapples, hand holding, ceaseless hugs, driving lessons (even the one when you yelled at me like crazy to test my 'driving under pressure'), college dorm room moves, college house moves, silly jokes that make no sense, random phone calls and voice messages left in funny voices, and SO MUCH MORE-- I love you and am starting to really enjoy the fact that my quirky character comes from you.

Happy birthday, dad. :)

My One and Only...

...chocolate chip cookie recipe!

In all seriousness, this is the only chocolate chip cookie recipe you will ever need. It's absolutely perfect! I will admit that I adapted this recipe from the famous NY Times recipe by Jacques Torres . The recipe already, as is, is wonderful, but I found myself tweaking it one day and absolutely loved the results. Using different flours is a must and makes a huge difference! Also, be sure to use really good quality chips-- I always try to find some that have a cacao content of 60% or more (it makes a world of difference).

In fact, I made a huge batch and brought them in to work last Friday as a "Happy 'First Week of School is Over' Day" celebration treat and they disappeared completely by the end of the school day. I was thrilled when my friend/colleague's 3 year old daughter told me they were "the best cookies I've ever ate!".

Please, please, please...make these soon!


The Best Chocolate Chip Cookies. Ever.
Makes 2-3 dozen 2 1/2 - 3 inch cookies
*adapted from Jacques Torres's NY Times recipe

2 cups, minus 2 tbsp, cake flour
1 2/3 cups all-purpose flour
1 1/4 tsp baking powder
1 1/4 tsp baking soda
1 1/2 tsp salt
1/2 tsp ground nutmeg
2 1/2 sticks unsalted butter (at room temperature)
1 3/4 cups + 2 tbsp dark brown sugar 
1/2 cup granulated white sugar 
2 large eggs (at room temperature)
2 tsp real vanilla extract
12 oz good quality dark chocolate chips
additional sea salt


Preheat the oven to 350 degrees F. 

1. Sift the flours, baking powder, baking soda, salt, and nutmeg together in a bowl large enough bowl and then set aside.

2. Using a mixer (or hand mixer) cream the butter and both sugars together for about 4-5 minutes until the mixture is light and fluffy. Add the eggs one and a time making sure to mix in each one well. Stir in the vanilla extract.

3. Reduce the speed to low and gradually add the dry ingredients into the butter, sugar, and eggs (I usually add it in thirds). Make sure to mix it just until it's combined and there aren't anymore "dry patches". This shouldn't take longer than about 10-20 seconds. Next, gently fold in the chocolate chips until they are pretty evenly distributed. * Press plastic wrap against dough and refrigerate for 24 to 36 hours. Dough may be used in batches, and can be refrigerated for up to 72 hours.

4. On a prepared baking sheet lined with parchment paper or Silipat, place 1 inch rounds of cookie dough about 2 inches apart from each other. Bake each batch for 16 minutes on the middle rack of the oven (just until nicely golden brown). Allow the cookies to cool for a few minutes before removing from the baking sheet and transferring to a cooling rack.

*Note: Keeping the dough refrigerated for the noted amount of time can really make a tasty difference. This step helps marry the flavors together; I have baked the cookies right away and skipped this step a few times and always notice a difference. However, they will still be delicious without refrigeration-- just less spunky.

Thursday, August 4, 2011

Something About the Chicken

Does your mind ever suddenly become overwhelmed with a sudden feeling in which you get the urge to do something you hadn't planned on? I'm talking about the, "I should do what? But I don't know if I want to... I'll feel guilty if I don't... Why am I so focused on this? Okay, I'm going to do it...but, really? Should I?" kind of feeling.

Towards the end of my grocery shopping today at a local market, I decided to swing by the deli section and spontaneously decided to place a hot rotisserie chicken in my cart. This chicken wasn't on my list, I didn't really need it, but it was a spur of the moment "this may make your weekend a little more capable of being lazy" decision. 

While struggling with the beeping and "Unexpected Item in Bagging Area" and "Please Wait for Assistance" reprimands at the self-checkout aisle, a man decided to wait behind my frazzled self to use my machine. I suggested that he may want to head over to another one that was open since I was obviously having technical difficulties. As he walked away from me, holding his small can of soda, I noticed his tattered clothes, dismayed facial expression, and the smell of what seemed to be weeks without a shower. My heart sank and I immediately wondered what he was going through and carried on with my purchasing.

After paying for my items, I walked out of the market and headed towards my car. Suddenly, I was overcome with the feeling described earlier above. In my mind, something was telling me to give the man I interacted with in passing the chicken I had just bought. However, I struggled with this idea and questioned myself. 

He seems homeless, but what if he's not and just having a hard day after work? What if he takes offense to me offering him food? I'm usually skeptical to do things like this, what if he's undeserving? What if? What if?

I actually circled around the parking lot and drove by him twice. Finally, I re-parked and asked myself the final question, "Does 'what if' really matter?". The worst that could happen is that he declines and I endure a little embarrassment. The best that could happen is that I may make his day. I could give him something he may really need and a sign of kindness and love in the world. With that, I grabbed the chicken and began to walk right up to him. As I approached, he looked up and just stared at me. When I was finally right next to him I simply said, "I don't know how you're day is going, but something is telling me you may need this more than I do right now". He looked up at me and I watched as his once dismayed expression quickly changed into a look of utter shock and joy. He didn't say anything to me except, "Really? Thank you so much."; I responded with a few words and walked back to my car. 

It took so much for me to do such a simple act of kindness. I struggled with my pride, made myself vulnerable, and fought with my doubts. However, following through with that feeling allowed me to remember that I am not one to judge. I am not one to continue asking myself "what if's" because I wonder if I should do something random and kind for a complete stranger. 

Some call the feeling that takes over your thoughts and leads your body to physically draw towards the task in your mind a gut feeling-- instinct. Some call it God. I believe it's both. The latter drives the former. 

This experience have lead me to realize that everything I did is a reflection of what I believe to be right in my heart and soul, but not always in my actions. I plan on working on living my heart out more.

I think as individuals, we need to pass on the chicken a little bit more. It's hard, believe me-- it's crazy hard for me to do this especially in situations like this with people I don't know. But if everyone ignored this "feeling" because of pride and fear of being vulnerable-- no one would get chicken.