Wednesday, September 28, 2011

Polenta Biscotti

I enjoy making simple cookies and snacks that are require minimal effort, but provide great satisfaction and joy. Biscotti is one of these cookies and baking a batch never becomes old to me. Here's a recipe for an interesting twist on a classic-- polenta biscotti! The added ingredient adds in interesting and subtle flavor with a bit more texture and crunch. Give this a go! You're tummy will thank you.


Polenta Biscotti
makes about 1 dozen pieces

2 cups all purpose flour
2/3 cup polenta
1 1/2 tsp baking powder
1/4 tsp salt
1/4 cup (4 tbsp) unsalted butter, cubed at room temperature
1/4 cup olive oil
1 cup white sugar
2 eggs, lightly beaten
1 tsp real vanilla extract
3 tbsp hazelnut liqueur

Preheat the oven to 350 degrees F.

1.In a large bowl, mix together and combine the flour, polenta, baking powder, and salt.

2. In another mixing bowl, beat the butter and oil together until smooth; beat in the sugar and then the eggs-- one at a time. Stir in the vanilla extract and hazelnut liqueur.

3. Gently pour in the wet ingredients into the flour and polenta mixture; fold the ingredients together until well combined. The dough should be slightly sticky (not runny). Take the dough out and place it on a lightly floured surface. Gently knead it together to shape it for about 30 seconds. Place the dough onto a prepared baking sheet that has been lined with parchment paper or a Silipat sheet. Shape the dough into an oblong mound that is about 12 inches long by 3-4 inches wide. Bake on the middle rack for 40 minutes. Remove and allow to cool on a rack for 25-30 minutes.

4. Use a serrated knife to cut 1 inch slices, on a diagonal bias. Place the cookies back on the prepared baking sheet with a cut side down. Return the cookies to the oven and bake for an additional 15 minutes. Allow the finished biscotti to cool completely before enjoying.

Monday, September 19, 2011

True Lunchbox Love


I don't know about you, but I love a good ol' PB and J sandwich. I loved them when I was a child, on my way to zero period in high school, as a poor college student, and even now as a poor elementary teacher. *wink*

Look how much fun he's having with that sandwich!
via


PB and J's are the ultimate lunchbox food in my book! I like mine with creamy PB and all natural blueberry preserves. What do you like yours with? 

Anyway, I found this cute video about the love that is Peanut Butter and Jelly. A simply adorable video to go with my short and simple post. I originally found this video on Huffington Post


Happy Monday, all! 

Wednesday, September 14, 2011

Wedding Wednesday

As some of you may know, the love of my life, and boyfriend of nearly 5 years, and I became engaged to be married about a month and half ago. Although planning the "the big stuff" and thinking about all the little details (we're our own planners!) has had it's share of being overwhelming so far, the fact that we're getting married (I'm getting married!!!) is so painfully satisfying and exciting for the both of us. I love to stop and let the thought "I'm going to spend the rest of my life with my best friend" resonate. Yea, yea...I know some of you are about to barf and probably not as a result of my previous post (see A Lesson in Excitement), but I can't help it-- I had to share it out a little. :)

Anyway, I read Style Me Pretty almost daily and enjoy getting inspiration from real weddings that are featured. Today, I stumbled upon a little video a couple from Seattle, John and Jessica, had created by a very talented Alec Cattarin. This video seriously had me on the brink of tears for two reasons: 1) I'm a huge  romantic sap and 2) It made me envision our wedding day.

I just had to share this beautiful little video with you all.


It's so precious and sweet-- love is amazing!

Monday, September 12, 2011

Quinoa and Vegetable Stuffed Roasted Tomatoes

Tomatoes??

Ta-may-taaaahs!

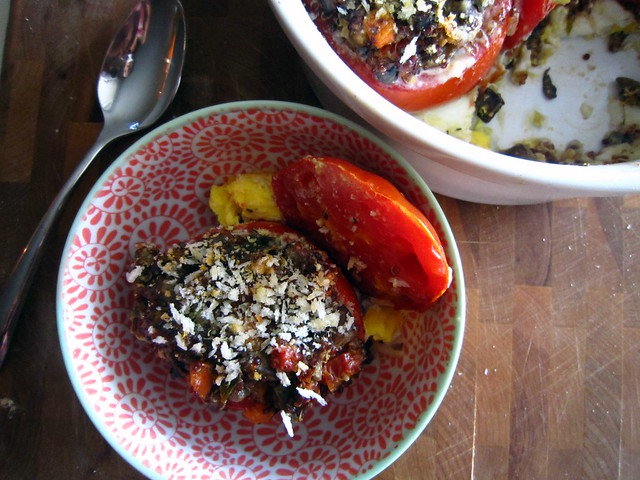
This piece-of-cake vegetarian dinner has the ability to make you excited (or even more enthusiastic) about tomatoes. Packed with oh-so-good for you veggies and protein packed, wonder-of-a-grain, quinoa (and extra baked eggs on the side, if you'd like)...mama would be proud!


What's the best part for me (besides my tummy's gratitude, that is)? This was a total refrigerator and pantry-raid meal--brilliant meals come from frantic minds and hungry bellies!

Quinoa and Vegetable Stuffed Roasted Tomatoes
serves 4

3 1/2 tsp olive oil, divided use
4 medium-large tomatoes
1/3 cup dry red quinoa
2/3 cup water
1/2 cup diced carrots (about 2 small-medium carrots)
1/3 cup chopped green onions
2 garlic cloves, minced
1 1/4 cup diced portabella mushrooms
1/4 cup sun-dried tomatoes (I prefer the kind in jars packed with olive oil), finely chopped
2 1/2 tsp salt, divided use
3/4 tsp pepper, divided use
1/4 tsp ground cumin
1/2 tsp dried oregano
1/2 tsp dried basil
3/4 cup grated parmigiano-reggiano  cheese, divided use
1/4 cup triple cream or brie cheese (without the rind)
1/4 cup panko bread crumbs

*for additional baked eggs you will need 4 large eggs.

Preheat the oven to 350 degrees F.

1. Cut about one inch of the tops off of each tomato. Carefully use a spoon and/or a knife to remove "insides" of each tomato; make sure to be careful and not cut through the body. Set aside the removed tomato bits and place the empty cavities into a small, yet deep, baking dish coated with 1 tbsp of olive oil.

2. In a small-medium saucepot, combine the dry red quinoa, water, and 1/2 tsp salt. Stir and bring to a boil; reduce to a simmer, cover, and allow quinoa to cook for about 10-15 minutes. Quinoa is cooked when grain begins to turn translucent, the spiral-like germ has begun to separate, and almost all of the water has been absorbed.

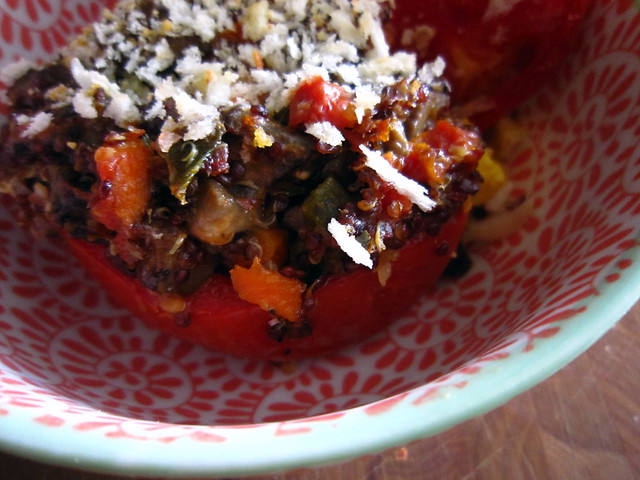
3. While the quinoa is cooking, heat 1 1/2 tsp of olive oil in a saute pan. Add the carrots green onion, and garlic--season with a pinch of salt and stir to cook; saute for about 3 mninutes on medium heat. Add the mushrooms, sun-dried tomatoes, and continue to stir and cook for an additional 4-5 minutes. When the quinoa is cooked, add it into the vegetable mixture and stir to combine. Add the remaining salt, pepper, cumino, oregano, basil, 1/4 cup of grated parmesano-reggiano cheese, and triple cream (or brie) cheese. Take half of the removed tomato parts (do not add the juice), coarsely chop it up, and add it to the pan. Continue to stir and cook for another 2-3 minutes on low-- cheese should be melted and well combined into the mixture.

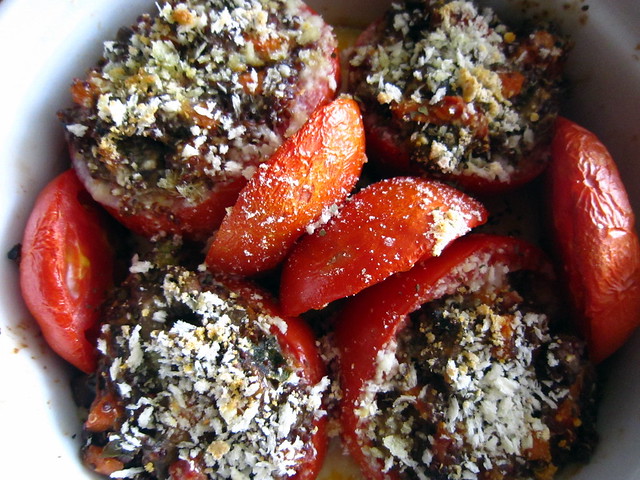
4. Sprinkle  1/4 cup of the grated parmgiano-reggiano cheese into each tomato; divide 1 tsp of salt and 1/4 tsp of pepper into and on the exterior of each of the tomatoes for extra seasoning. Gently scoop and pat down even amounts of the vegetable filling into each empty tomato until all of it has been used. Evenly sprinkle the panko bread crumbs and the remaining 1/4 cup of grated parmigiano-reggiano cheese atop the tomatoes. Take the tomato caps and gently squeeze them in between the tomatos where some room exists. Drizzle the remaining 1 tbsp of olive oil across the tomatoes and roast them for about 40-45 minutes on the middle rack. *optional: crack each of the eggs into empty spaces in the baking dish after 20 minutes of cooking time.* Panko and cheese crust should be golden brown.

Friday, September 9, 2011

Wear What you Eat


Wear these charming little oxford wedges from Ruche and eat these melt-in-your-mouth homemade caramels from The Kitchn  (I made them before here).

Happy Weekend! I hope you're celebrating, too!

Wednesday, September 7, 2011

Birthday Cake Whoopie Pies

My older brother loves good ol' fashioned white cake with buttercream frosting. Ever since I can remember, it has always been his cake of choice for birthdays and celebrations. Any other more unique cake just won't do-- there's no substitute for a slice of this simple cake.


When he moved up to Northern California to embark on a new career path, I was thrilled since he would be much closer to me. To celebrate, I wanted to bake him something sweet and delightful. I immediately thought of making him a cake, but knew he wouldn't eat much of it so I opted for something much more portable and snackable-- whoopie pies! Yup, I made Birthday Cake Whoopie Pies. Not only did they taste just like a traditional and simple birthday cake, they were adorable to package...and eat.


 I know these really weren't for a birthday, but any day can feel like one when you've got these cuties around to munch on. 


Birthday Cake Whoopie Pies
1 package white cake mix
3 eggs 
1/2 cup of water
1/2 cup of vegetable oil
3 cups powdered sugar
1 cup (2 sticks) unsalted butter
1 tsp vanilla extract
1-2 tbsp heavy cream
food color gel of choice
sprinkles of choice


Preheat oven to 350 degrees F.

1. Use a mixer to combine cake mix, eggs, water, and oil.  Beat this together for a few minutes until mixture is well combined, light, and fluffy.
;)
2. Fill a piping bag with the batter and pipe rounds in approximately 1-2"diameter on prepared baking sheets lined with parchment paper or Silpat (you could also just gently spoon out the batter then use the back of the spoon to smooth the round out). Be sure to leave about 2" between each mound. Bake for about 8-10 minutes or just until lightly golden brown. Allow these cake cookies to cool completely.


3. Meanwhile, using a mixer with a whisk attachment, beat together the sugar and butter. Mix this on low until everything is well blended then continue to mix on medium-high for another 2-3 minutes.  Add vanilla and heavy cream while continuing to beat for another minute. Add desired amount of food color and beat for another minute until the desired hue is reached.  Mixture should be firm, yet smooth. 


4. Fill another piping bag with the buttercream and generously pipe the back of a cooled cake cookie. Place another cake cookie on top of the buttercream; gently shake sprinkles onto the sides of the whoopie pie while turning it so all sides are lightly covered. Repeat with the remaining cake cookies and frosting. 
Store in an air-tight container...or consume immediately. 

Tuesday, September 6, 2011

Library Day

Currently Reading...

The Blind Contessa's New Machine by Carey Wallace
This is a charming fictional story based on the true events of Carolina Fantoni, an Italian woman from the 1800's, and her emotional and gradual journey towards losing her sight and strengthening her soul. No one believes she is truly going blind except for an inventor, Turri. Both grow closer in several ways as Turri works on a new invention to help Carolina communicate with the world. Through acts of love and support a writing machine that changes everything is born-- one of the first typewriters.

Crazy Love by Francis Chan
Francis Chan shares his experiences and thoughts as he picks apart the true meaning of being a Christian and genuinely loving God. He challenges Christians and readers to go beyond the "status quo" and fulfill their hunger for an authentic faith held together with "tangible and even radical solutions". Chan states that Christianity is more than following a list of do's and don'ts, but rather truly and whole-heartedly falling in love with God-- because once you're wildly in love with someone, it changes everything.

The Persian Pickle Club by Sandra Dallas
Sandra Dallas magically takes readers through the 1930's while Harveyville, Kansas struggles with the hard hit of the Great Depression. A young farm wife, Queenie Bean, is part of a weekly gathering of local women-- the Persian Pickle Club. In this club, the ladies focus on exchanging good ol' gossip, quilting, and over all improving the minds and souls. However, when a deep and dark secret is brought to the group, the women of Harveyville learn to stick together in order to support and protect through good times and bad times alike.