Saturday, July 27, 2013

Oh Kale Yeah!


I am loving these multi-purpose totes from West Elm! No, they would not replace my Marc Jacobs bag, but I would have so much joy in using these for groceries and everyday errands! My favorite one is the "Oh Kale Yeah" tote since Henry and I eat about 10 lbs. of the mighty green a week.

I might just have to swing by my local West Elm to see if they have these available! :)


Say It With Totes!

1 // 2 // 3

Tuesday, July 23, 2013

Seared Skirt Steak Salad with Lime-Ginger Vinaigrette

Henry and I are "bad" Asians.

He is Vietnamese and I am Chinese (and part Cambodian). The number of times food of our culture appears in our home is miniscule. In fact, we consume brown rice (stead of white) and the 10 lb. bag I purchased almost a year ago still filled up nearly all of its storage container up until a few days ago when we had to toss it due to the development of pantry moths in the batch (GROSS--I still have nightmares). I don't even have a bottle of soy sauce in the kitchen at the moment, our Siracha will most likely last us past the expiration date, and we didn't buy chopsticks until last April.

I told you, we're "bad" Asians.
We love Asian food, we just hardly consume or cook it for ourselves. However, when I do cook dishes that I learned from my mother, it is a pretty big deal. These include traditional dumplings, noodle soups, and basic stir-fry dishes. It's also a pretty noteworthy when I make Asian-inspired dishes-- mostly because I adore ginger and it's usually a key ingredient.

Too bad I use the pre-crushed ginger you can purchase in jars from the market. See? Bad Asian.

Sorry, mama. Now when you tell me to use a piece of ginger "the size of my thumb", I just use a measuring spoon. Eep!

Nevertheless, you can trust that this "bad" Asian, made a pretty amazing Asian-ish salad.

Henry and I eat a lot of greens and this meal is a great example of our usual complete-meal-definitely-not-just-romaine-and-croutons-salad. The best part about this skirt steak salad is the dressing-- if you don't prefer steak, you can easily substitute chicken for it (or even leave it out). Honestly, there's nothing to this dish besides finding whatever veggies look good to me or I have in the fridge. Tonight, I placed the skirt steak on top of a bed of mixed spring greens, arugula, spinach, shaved carrots, bell peppers, cilantro, avocado, and sliced almonds. A drizzle of the super flavorful and refreshing Lime-Ginger Vinaigrette ties everything together! Yum!

Seared Skirt Steak
adapted from Real Simple

1 1/4 lb skirt steak
salt and pepper
olive oil

1. If the skirt steak is quite large, cut it into sections so that it can fit on the skillet. Season both sides with salt and pepper to taste (I prefer about 1/4 tsp of salt and pepper per side). Heat about 1 tbsp of olive oil on a skillet. Add the steak and cook each side on medium-high heat for about 4-5 minutes for medium rare (or longer for your desired temperature). Transfer the meat to a cutting board and allow it to rest for 5-8 minutes before slicing it.

Lime-Ginger Vinaigrette
makes about 1/2 cup

2 tbsp olive oil
1 tbsp sesame oil
1 tbsp freshly grated ginger
1 1/2 tsp wasabi paste
1 tbsp honey
1/4 cup rice wine vinegar
juice of 1/2 large lime (about 1 tbsp)
1 tbsp sesame seeds
salt and pepper

1. In a small bowl, combine all the ingredients, except for salt and pepper. Use a whisk to thoroughly combine all the ingredients. Season with salt and pepper to taste.

Sunday, July 21, 2013

Dream Big

I think we can all agree that having dreams is important. You've got to dream big and set strong, yet realistic goals, to achieve. Well, lately I feel like I have been, indeed, dreaming on a larger scale.

This week, I dreamt of...

...folding the laundry that's made a pile in our bedroom,
giving my dogs a bath,
fixing the curtain rod that collapsed in our loft,
finishing the chair in the garage that I am trying to reupholster,
dusting our staircase,
getting a blog post published,
....and, I'll be really honest, a big, big, soft and chewy...

butterscotch cookie. 

Okay, I lied. Make that two cookies (dreaming big, here).

I didn't just place all of those dreams on my list only to continue not making them happen. Most of them were reached yesterday and the blog post is happening NOW. Cha-ching!

My schedule's been so full lately since pastry school started. I find that while commuting back and forth between class and tutoring sessions keeps me moving when I am not sitting for hours completing homework and reading texts. This does make balancing household duties and unfinished projects difficult. 

Well, what do you know-- there's another part of the teacher lifestyle I still have in me. Ha!

Do you ever wish you had a genie to make all your dreams come true with the wrinkle of her nose?
My genie in a bottle is MIA, but if yours comes around...please ask her for my cookie.


Thursday, July 11, 2013

The First Week of Pastry School!

It has arrived! My first quarter in pastry school started this week!

Monday was my very first day of classes. Since I haven't been teaching for several months now, It had been awhile since I found myself in the early-to-rise and early-to-work (or school in this case) routine. However, I shot out of bed Monday morning at 4:45, went to the gym for an hour of cardio/strength training, finished getting ready, and drove to school-- all with enthusiasm and high energy! It seemed so surreal that this new chapter in my life was coming into full view.
A look at some ID cards through the years! Do you like the hair in my face on my new student ID card?
Hubs says it's very 90's.  Haha...Whatever, I can't remember the last time I actually was fond of my ID picture! 
My schedule this quarter is pretty decent, in my opinion. I have class Monday-Wednesday; Wednesday is the only day that I have two lectures. With this schedule, I am able to still fully continue private tutoring my students-- it ends up working out pretty nicely. Although I don't have any lab/kitchen classes this quarter, my lectures seem promising. Two classes focus on various avenues of management in the culinary industry, one course is about nutrion science, and my last class delivers the theory behind the fundamental concepts and techniques of the kitchen. Lectures are long and run 3-4 hours each, but I really enjoy them. I love how specific they are to exactly what I want to be learning! As long as I remember to pack an ample amount of healthy snacks to keep me fueled, the sitting and note-taking is not bad at all.
Prepping lesson plans for my students and class syllabi and assignments for myself! Is it wrong that I absolutely love organizing my school notebooks/binders? I always have...I confess to also liking homework. Judge me all you want.
Unfortunately for Henry, though, I have been talking his ears off all week about my experiences, opinions, and ideas about all my classes. Each day of class, he always came home eager to hear about my day...so I lay it all out! My hubby is so supportive and encouraging (as always)!
Even with school and tutoring, baking orders still get fulfilled! We've got macarons for days, here.
The most enlightening part of this first week of school is the realization that I am completely and truly present-- emotionally and physically-- in the journey of working towards my passion. Stepping onto campus, walking by the kitchens, and sitting in class-- these are all reminders and symbols that I am exactly where I need and want to be (mind and body). The light bulb in my head seems to be beaming much brighter as my "student-mode" focuses on subject matter my heart has selected. It is so dynamically different to be in school, this third time around. Whether it be the fact that I am now older or that I am choosing to be in student to work on something I love, my lens is stronger, sharper, and more focused. I find myself trying to "milk" the learning out of my experience and lecture and I am way more of a dedicated student. This is not to say that while earning my B.A. or M.Ed. I wasn't dedicated, but in comparison  those experiences feel like I was just moving down stream and following the expected path. This time, I am making my own path...and it feels wonderful!
Yesterday, after class, I just sat on a bench and soaked it all in.
I look forward to the journey between now and the next year and a half. :)


Monday, July 8, 2013

OMP on Lookie Boo!

A few weeks ago I had the opportunity to work with Tiffany of Lookie Boo (modern and vintage threads for hip littles). She was in need of some sweet treats for her daughter's second birthday party. The theme for the event was a gold and pink beauty queen celebration-- quite adorable for a sweet little girl if you ask me! I was super excited to be able to contribute some of my work for the super cute event. 

I made strawberry lemonade cupcakes (vanilla filled with fresh lemon curd and topped with strawberry buttercream), edible glitter heart and tiara sugar cookies, and almond cream French macarons. Below are some photos from the day, but for more pictures, of the fun event, check out Lookie Boo's blog page. 


Saturday, July 6, 2013

Birthday Cake Macarons

Today is my older brother's birthday! He's always been picky with his sweets. By picky, I mean he only loves all things overly sweet and flavored like Costco's white sheet cakes. However, he does love when I make macarons. So what does a little sister do? She makes birthday cake flavored macarons!
 These little guys are filled with thick and creamy cake batter flavored frosting and dressed up with a cheerful mix of colored sprinkles. The combination of a delicate French macaron and a classic celebratory cake flavor is such a fun and interesting twist for a little sweet treat.
Birthday cake macarons are joining the celebration, ladies and gents...with their party hats and all!
 Birthday Cake Macarons
100 g aged egg whites (aged= resting in an air-tight container in the fridge for 3-5 days)
1 tsp cream of tartar
28 g white granulated sugar
125 g finely ground almond meal (Bob's Red Mill makes a great one)
200 g powdered sugar*
1 tsp real vanilla extract
optional: 1-2 drops of ivory yellow food gel coloring (do not use liquid food coloring)

Prepare two baking sheets lined with silicone mats (or parchment paper if you don't have these).

1. Combine and whisk together the almond meal and powdered sugar. Set aside.

2. Using a stand mixer with a whisk attachment, beat the egg whites on a low speed with the cream of tartar until the mixture becomes foamy (kind of like a bubble bath). At this point, slowly pour in the white granulated sugar as the mixer is running. Add the vanilla and increase the speed to medium; continue to beat the mixture until a smooth glossy meringue with soft peaks has formed (kind of like shaving cream). Be careful to NOT over beat and dry out your egg whites. If you are coloring your macarons, add a few drops of the gel coloring a little bit before your egg whites have reached their soft and glossy peaks.

3. Remove the bowl from your stand mixer and add 1/3 of the almond meal and powdered sugar mixture. Gently fold together just until everything is combined. Repeat with the next 1/3 of the dry ingredients and again with the final 1/3.

4. Prepare a pastry bag with a medium round tip (about 1 cm) and transfer the macaron batter into it. Pipe small circles onto the prepared baking sheets to make neat rows. Be sure to leave about 1 1/2 inches between each macaron. Grab the ends of the baking sheet and, while holding it level, firmly tap it on the counter a few times to get rid of any air bubbles. Allow the macarons to rest on the counter for 30-60 minutes before baking.

5. Preheat the oven to 295 degrees F and make sure the racks are in the middle portion. Bake the macarons for 15-20 minutes, one sheet at a time. Do not open the oven door at all! Once they are finished, allow them to cool for a few minutes; Gently peel away the silicone mat while lightly pushing the macaron cookies off. Repeat with the remaining trays of macarons.*Note: Baking times may vary depending on your oven and the temperature/humidity in the room. These are very temperamental; I suggest testing a small batch to find your ideal baking time with your oven.

6. Once cooled, fill the macarons with the cake batter filling (recipe below). Pipe a small dollop onto the back side of one macaron shell and sandwiching it together with another. Repeat with the rest of the macarons. If not consuming right away, store them in an airtight container and keep them in the fridge.

Cake Batter Buttercream
3 sticks (1 1/2 cups) unsalted butter, room temperature
1 2/3 cup white cake mix
2 tsp heavy cream
1 tsp vanilla extract
optional: additional powdered sugar

1. Cream the butter, white cake mix, heavy cream, and vanilla extract until smooth. If desired, add extra sugar to achieve desired sweetness. 


Thursday, July 4, 2013

Independence & Berry Pie Pops

Happy 4th of July!

I seem to be on a two-day streak of pie lovin', but I don't see anyone complaining.
Nothing says America more than a good ol' fashioned pie. Well, unless you take that pie and put it on a stick. Yep...America seems to have a fascination with desserts on sticks, lately. Although, the cake pop frenzy flew right by my house, I have to say that I am loving these teeny pie pops! Maybe it's because I find buttery and flaky dough far superior to cake balls in chocolate. Perhaps it's the ooey and gooey fresh and tart berry filling. Whatever it is, you can just trust me that they are good and sure to please!
Add some stars, red, white, and blue and you've got yourself some pretty patriotic portable pies (to all my former 5th graders: that's alliteration).

To make these pie pops, you will need:
Two batches of pie dough using my recipe HERE.
11 paper straws (cut in half to get 22 total OR you can use regular lollipop sticks)
Homemade blueberry and raspberry filling (recipe for this is listed at the end) OR store bought jam
Egg wash (one lightly beaten egg mixed with 2 tsp water)
Brush
Cinnamon & sugar topping ( 1/4 cup sugar and 1 1/2 tbsp cinnamon)
Fork

Directions
Roll out chilled pie dough, use a 2.5" cookie cutter to make circles, and then place them on a lined cookie sheet to chill in the fridge. Roll up leftover dough and repeat. You should be able to make about 44 circles to make about 22 pops in all.
Place the top inch, or so, on the bottom of each pie crust. Be sure to apply enough pressure so the stick/straw is secure through the baking process. 
Be careful and don't overfill your pie bottom! Leave about a 1/2" border to allow room for crimping and so the filling doesn't ooze out.
Bake the pie pops in a preheated 375 degree F. oven (middle third of the oven) for 18-20 minutes. The crusts should be golden brown.

Berry Filling
This recipe will make more than enough for these pie pops. Save the leftovers in a sealed container in the fridge for future use or consumption. :) I made two separate batches, blueberry and raspberry, but you could certainly do a mixed combo.

1 cup berries (choose between blueberry, raspberry, blackberry, or strawberry)
1/3 cup white sugar
1 tsp lemon extract (or 2 tsp lemon juice)
1 1/2 tbsp corn starch

1. In sauce pot, combine all the ingredients and stir over low heat. Continue to stir and cook until the fruit breaks down and the mixture becomes thick and glossy. This should take about 8 minutes.


Wednesday, July 3, 2013

Mini Strawberry-Almond Pies

When joining friends for dinner, I always make it a point to see if I can contribute anything. More often than not, this usually involves dessert.
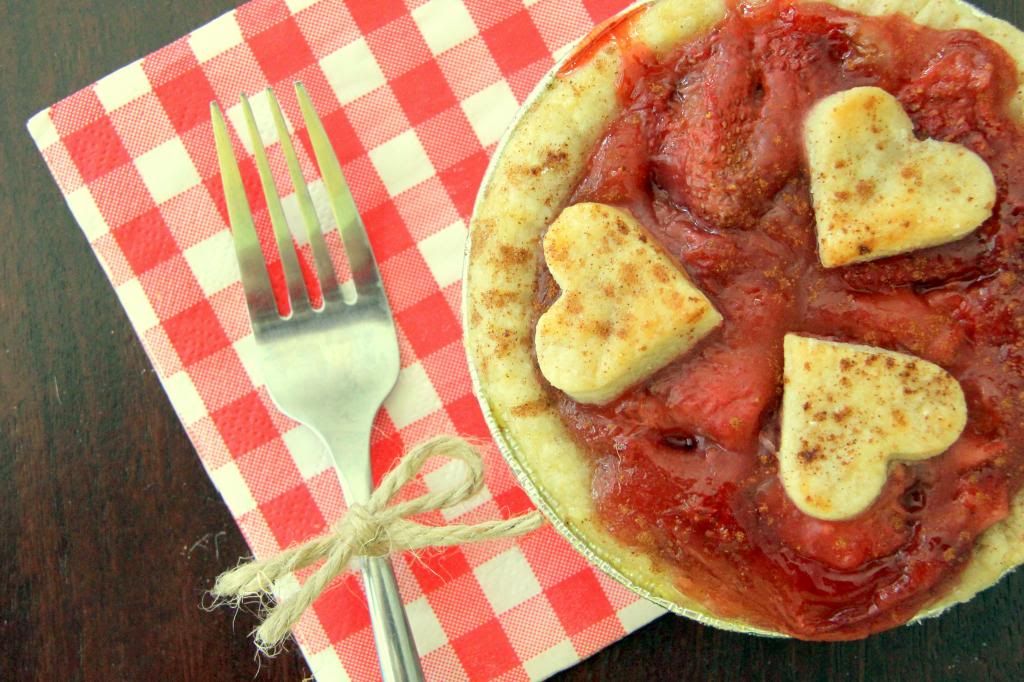
 Last night was no exception as Henry and I headed to our friends' place to share a delicious meal. My local market had a sale on  good-looking strawberries earlier in the week. I thought a fresh berry pie would bring the warmth of summer and the comforts of a classic homemade dessert. However, I changed it up a bit and, instead of making a whole pie, I opted for personalized mini ones.
 Now, sugar and butter are always delicious...but when they come in itty-bitty sizes, they are extra satisfying! Call me a sucker for cute little treats--I am guilty as charged! These petite pies were also great because we didn't have to worry about cutting a whole pie.
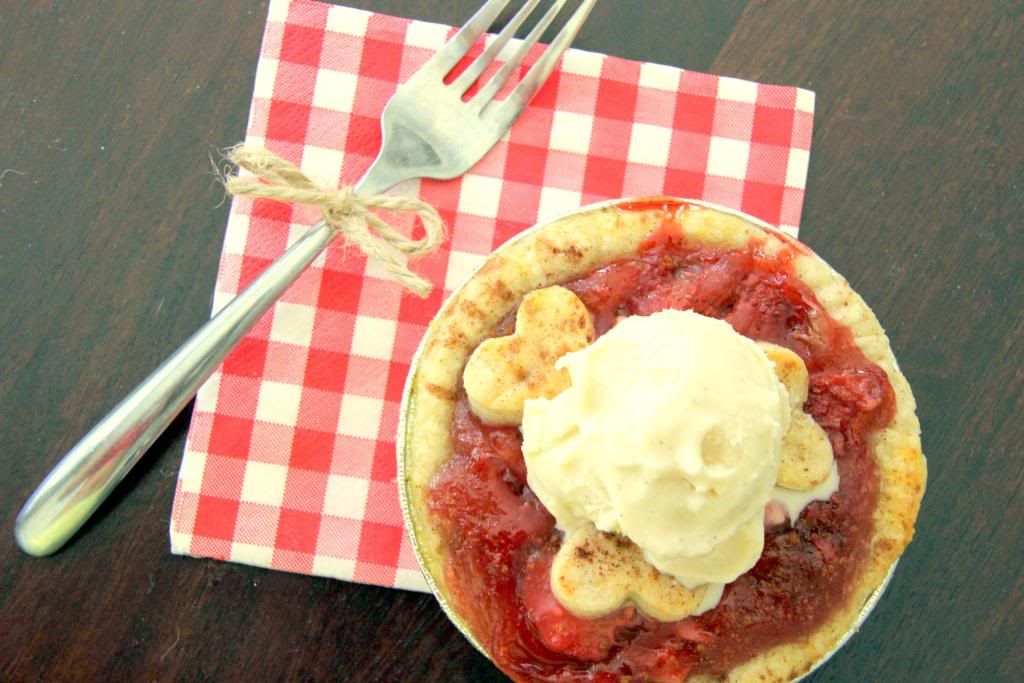
 The four of us got to enjoy our own little strawberry-almond pie. I didn't think it could get any better...until our pies joined forces with vanilla ice cream.
A la mode? More like "a la get-in-my-belly".

Mini Strawberry-Almond Pies
makes six 3" pies
*Note: Individual mini-pie tins can be found at specialty bakeshops. If you don't have these available, you can use a muffin/cupcake tray and make a larger quantity of extra-mini pies (use an approximate 2.5" cookie cutter to cut circles out of the pie dough and then press them into the hollows of the tray).

Pie-dough
2 1/4 cups all purpose flour
1 cup (2 sticks) unsalted butter, cold and cut into cubes
1/2 tsp salt
1/4 cup white sugar
1/4 cup ice cold water

1. In food processor, pulse together the flour, salt, and sugar. Add the cubed butter and process until the mixture resembles course sand. While the food processor is running, slowly stream in the cold water until the dough starts to form and pull away from the sides.

2. Transfer the dough to a lightly floured surface and gently knead together for just a few seconds. Wrap with plastic and chill in the refrigerator for one hour.

Filling and Topping
2 lbs fresh strawberries, hulled (divided use)
3 1/2 tbsp cornstarch
1/2 tsp salt
1 cup and 2 tbsp white sugar (divided use)
2 tsp lemon juice (or 1 tsp lemon oil extract)
1 tsp vanilla extract
2 1/2 tsp almond extract
1 1/2 tsp rose water
1 tbsp ground cinnamon
1 egg, lightly beaten
1/4 cup sliced almonds (not pictured here, only in memory as we ate them last night :) )

1. Chop one pound of the strawberries into small pieces. With the other pound of strawberries, cut each berry in half (if the berry is large, cut it into fourths)-- you want these to be relatively chunky in size.

2. In a medium sauce pan, combine the strawberries that have been chopped into small pieces with the cornstarch, salt, 1 cup of the white sugar, lemon juice, vanilla extract, almond extract, and rose water. Heat the mixture on a medium flame and use a whisk to stir continuously. Once the fruit mixture begins to bubble and thicken, turn the heat off. Stir in the other pound of cut berries and set aside.

Assembly
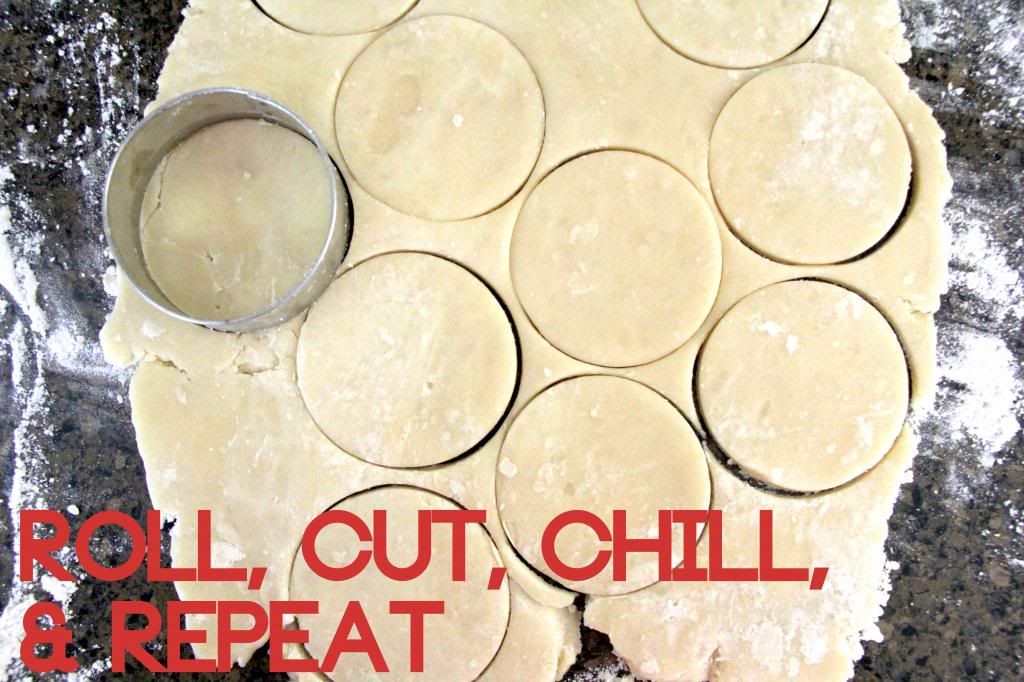
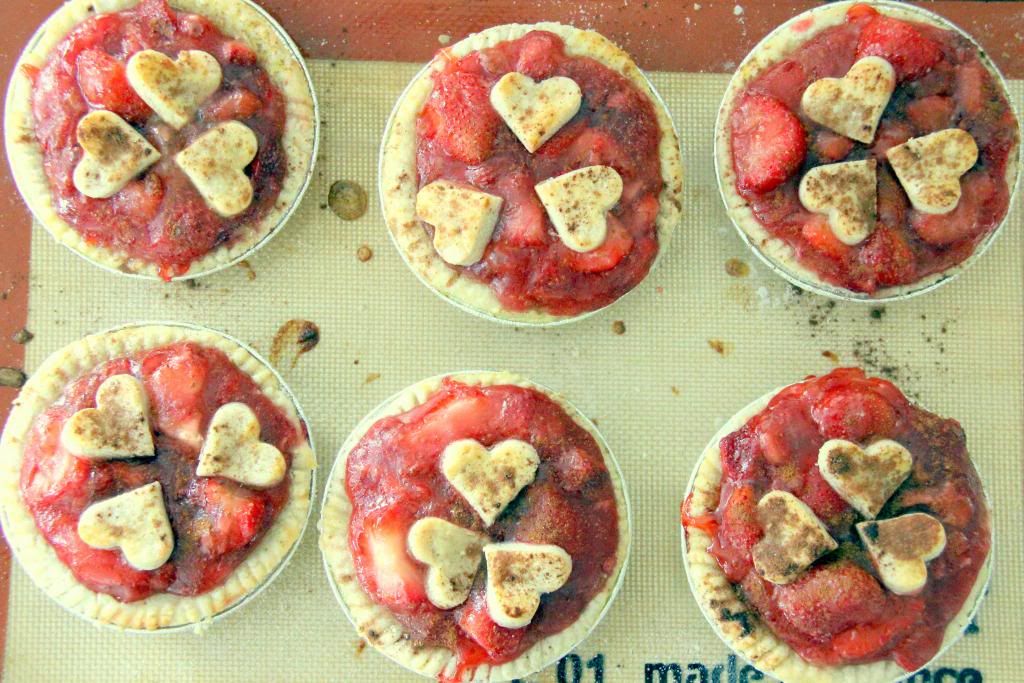
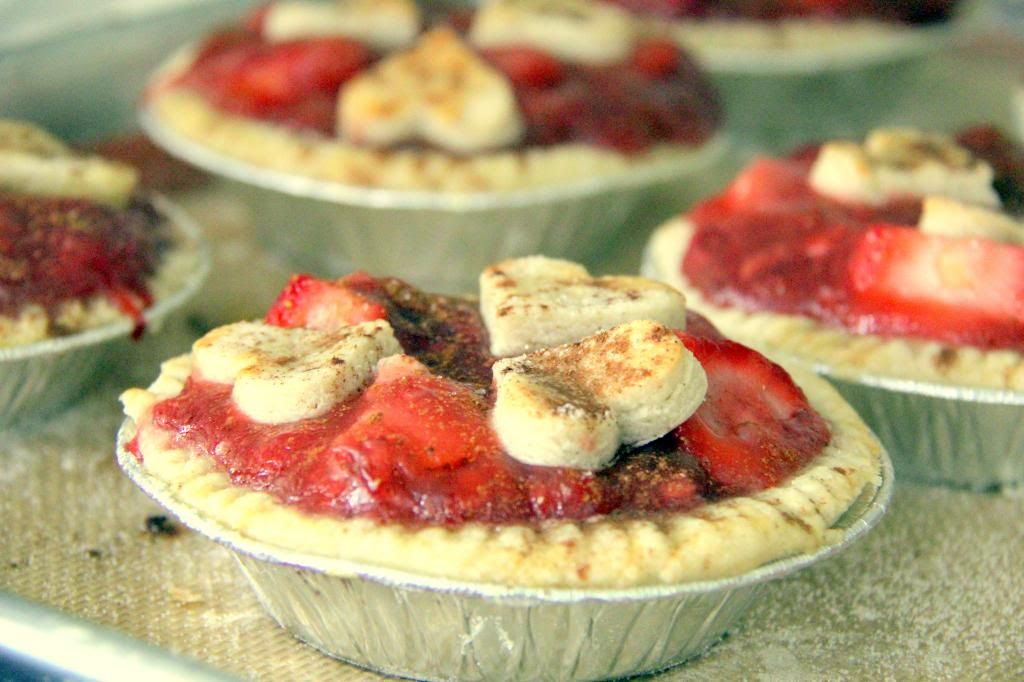
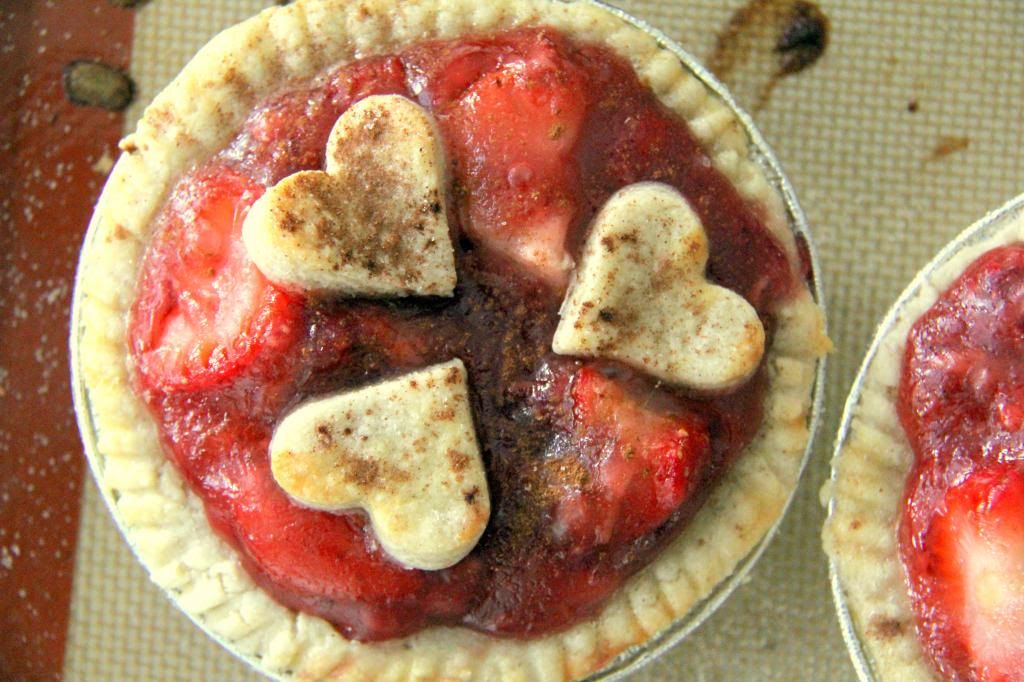
1. Remove and unwrap the chilled pie dough from the refrigerator and place it on a lightly floured surface. Roll the dough out until it is about 1/4" thick. Use a 3" circle cookie cutter (or glass, bowl, etc) to cut six pie crusts out. Use the remaining dough to punch out hearts (or whatever shapes you'd like) to add on top of the pies. Gently press each piece of dough into each mini pie tin-- be sure to push the dough up against the sides and on the rim/edges. Use a fork to press the edges of the crust onto the rim of the pie tins. Place the pies on to a lined baking sheet.

2.Divide the strawberry filling into each mini pie tin. Decorate the tops with the cut out hearts (or whatever shape you went for). 

3. Mix the lightly beaten egg with 2 tsp water. Lightly brush this egg wash onto the edges of the pies and the decorative pieces on the surface. Mix the 2 tbsp of sugar and 1 tbsp of cinnamon in a small bowl. Sprinkle this mixture over the tops of the six mini-pies. Bake the mini-pies at 375 degrees F. for 12-15 minutes, or until the crusts and tops are golden brown. Allow to cool slightly before serving. Garnish with sliced almonds...and definitely ice cream!


Tuesday, July 2, 2013

The Life Cycle of a Macaron

When I first attempted to make a batch of macarons four years ago, I didn't anticipate that I would be hooked on making them. It took trials and trials of recipes and methods to finally get the right technique down. Now, macarons are frequent visitors in my kitchen. Whether I am making them for people, or just playing around with flavors for my hubby and I to enjoy, making them just doesn't get old. In fact, I find the process of making macarons to be quite systematic and ritual like.

What's the day in the life of a macaron? Well, if they could speak for themselves, they may tell you it's something like this...

1. Ingredients are prepped. Meringue whips up to the perfect stiff peak stage right before the smooth yet thick batter is ready for piping.
2. Trays are double stacked. Macarons are piped carefully and strategically. Sweet decorative details are added at this point. These guys get to chill for about 30-45 minutes before heading into the oven.
3. Macaron shells are ready and cooled. They are paired, bottom side up, on the tray. The filling of choice is piped on one of each macaron shell pair. Once filled, their mates top them off creating a perfect little "sandwich".
4. Macarons are distributed for any orders or gifts. Perfectly snug and secure packaging is essential to ensure the delicate macarons don't crack or break!
 
5. Remaining macarons are transferred to bowls or dessert stands in my kitchen. Henry finds them easily.
 
6. Testing for deliciousness is key! Sweet little macarons are examined...
7. Then a bite is taken from them...
8.And another bite...
9. ...and viola! The macaron is consumed leaving a slight memory behind, in the form of sprinkles, sugar, filling, or crumbs, behind on your finger tips.
10. Finally, history repeats itself and more macarons are consumed. Just for a little while, until more macarons are made. 

Life cycles are a beautiful thing.