Sunday, July 8, 2012

Tiffany Blue

 I recently had the privilege to prepare a cake for a colleague/friend's mother's 50th birthday party. Not only was I honored to take part in such a wonderful celebration, but I was super excited to create the cake she had in mind. My friend's mom, Janiece, wanted a Tiffany & Co. style cake; the idea of making such a girly design had me giddy all over! 

This 8x8" chocolate layer cake is filled with vanilla buttercream and fresh strawberries. To accommodate the large guest list of nearly 100 people, two 11x15" sheet cakes were also prepared. 


Happy Birthday, Janiece! I hope it was a lovely 50th. :) 

Friday, June 29, 2012

Macarons-- Made to Order!

I've been busy in my kitchen baking up much to many macarons! These fresh strawberry and chocolate hazelnut macarons were delightfully delicious and packed carefully away for shipping. :)


Friday, May 18, 2012

A Double Celebration Cake

Recently, my very good friend turned 27 and graduated with her doctorate degree! What an incredible day filled with two very amazing things to celebrate--AND she and her wonderful man just got engaged!

I had the pleasure of creating a celebratory cake for her and the large group of supportive friends and family for her special double whammy day.


When I was drafting ideas for her cake's design, I thought of her personal style. She definitely keeps it elegant and simple, but plays up pops of color here and there. I decided to go for a white base with vibrant colored pinwheels. For the gray top tier polka dots were added as a spunky touch. I liked the simple and adorable design so much, I didn't want to offset it with a large banner or anything--a little addition of a graduation cap and her age were placed on top along with her name. :)

Tuesday, May 1, 2012

Life Tidbits

Gah! There have been a ton of things going on lately and sometimes I find myself struggling to remember to take deep breaths and calm down. I need to remember to have faith, do the best that I can, and keep on truckin' along! :)

It's so important to just...

Stop.

...and enjoy the little (or big things) that bring everyday smiles and joy to your life.

Here are some of my smile-makin' life tidbits:


(from top left to bottom right: 1. caramel balsamico gelato at home, 2. spring tulips in a vintage milk jug, 3. an assortment of brand new ribbon spools in darling prints and colors, 4. my love sipping on soda, 5. playful pups and their favorite toy, and 6. a fresh spring salad made with colorful organic carrots, baby heirloom tomatoes, and a light lemon vinaigrette.)

Sunday, April 22, 2012

Show Off Your (Banana Nut) Muffin Tops

Alright ladies-- get out those bikinis!

spotty bandeau bikini via
Oh, that's darling! But I actually was referring to these swim suits...


cupcake liners from sweet estelle via

So yea, now that we're clear-- you heard me! Show off your muffin top. Do it with pride! It's getting warmer and I know you've been waiting to pull whip out that adorable suit of yours and feel good about those extra goodies on the side. Forget any negative comments you've ever heard about your muffin top-- curves are back!


Muffin top? More like love tops, baby!


Lookin' good ladies. Especially in those darling pink polka dot bikinis. 

Banana nut muffin with almond butter and peach lavender jam
Whole-Wheat Banana Nut Muffins (with Yogurt & Chia Seeds)
makes 1 dozen

1 1/2 whole wheat pastry flour
1 tsp baking soda
1 tsp baking powder
1/2 tsp salt
1/2 cup chia seeds (*optional)
1/2 cup unsweetened shredded coconut
3 large ripened bananas (divided use)
1/2 cup non fat plain Greek yogurt
1/2 cup canola oil
1/2 cup brown sugar
1/4 cup raw sugar (divided use)
1 large egg
1 tsp vanilla extract
1 cup toasted and chopped walnuts

Pre-heat oven to 350 degrees F.
Prepare your muffin tin by lining each cup with a paper liner or lightly greasing and flouring them.

1. In a medium bowl, combine and whisk together the flour, baking soda, baking powder, chia seeds, salt,  and coconut. Set aside.

2. In a large bowl, use a hand mixer to blend 2 1/2 bananas, yogurt, oil, brown sugar, 2 tbsp raw sugar, the egg, and the vanilla extract. Once all the ingredients are well combined (about 1-2 minutes), mix in the dry ingredients in two batches just until batter is no longer "dry"-- don't over mix. Gently fold in the chopped walnuts.

3. Scoop batter into each muffin cup. Fill the cups to the edge for well mounded muffins or overfill them slightly for a bigger muffin top. Cut thin slices of the remaining banana half and place them on top of each muffin. Sprinkle the remaining raw sugar evenly over the cups before placing them in the middle third of the oven. Bake for 22-25 minutes; a toothpick should come out clean and muffins should be slightly browned.

Sunday, April 15, 2012

Blackberry Custard Macarons

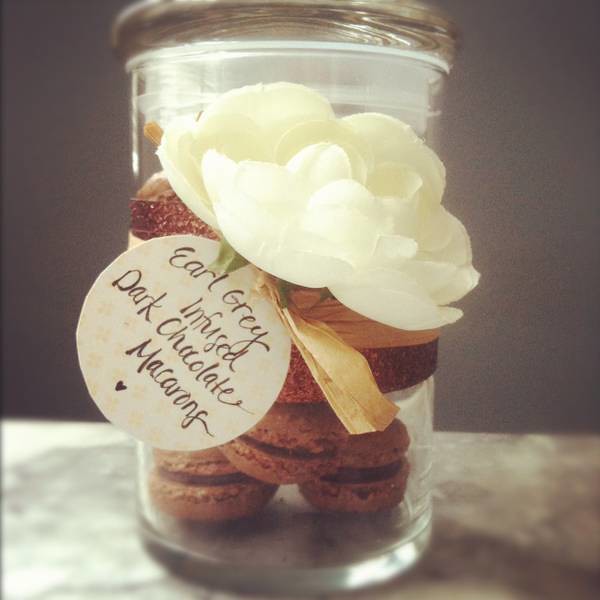
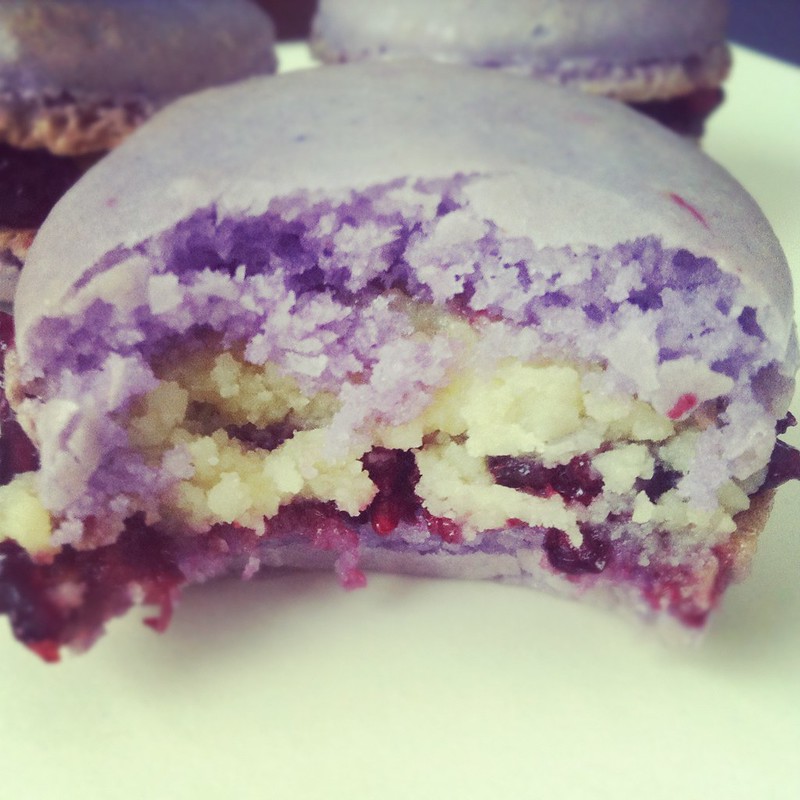
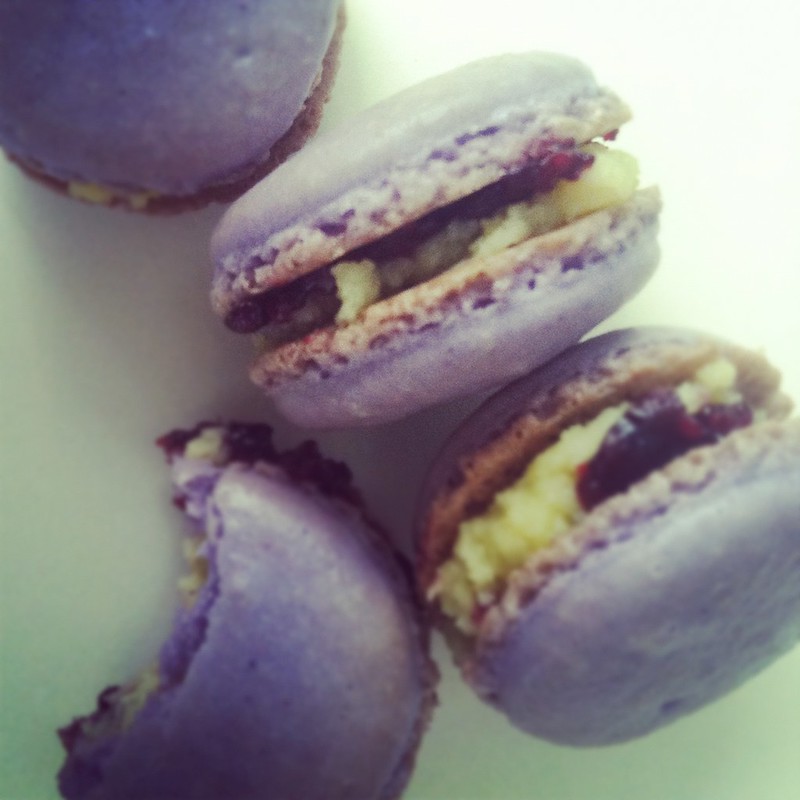
Today's Sunday sweets are delightful purple macarons filled with homemade blackberry jam and a spread of thick custard cream.

Don't even try to fool yourself. 


You won't be able to stop after one.  You may not even want to share.


However, this is neither the time nor the place to be selfish.


So you better make yourself an extra batch! 

Blackberry Custard Macarons
For the shells:
100 g aged egg whites (aged= resting in an air-tight container in the fridge for 3-5 days)
1 tsp cream of tartar
28 g white granulated sugar
125 g finely ground almond meal (Bob's Red Mill makes a great one)
200 g powdered sugar*
1 tsp real vanilla extract
optional: purple food gel coloring (do not use liquid food coloring)

1. Combine and whisk together the almond meal and powdered sugar. Set aside.

3. Remove the bowl from your stand mixer and add 1/3 of the almond meal and powdered sugar mixture. Gently fold together just until everything is combined. Repeat with the next 1/3 of the dry ingredients and again with the final 1/3.

3. Remove the bowl from your stand mixer and add 1/3 of the almond meal and powdered sugar mixture. Gently fold together just until everything is combined. Repeat with the next 1/3 of the dry ingredients and again with the final 1/3.

Prepare two baking sheets lined with silicone mats (or parchment paper if you don't have these).

2. Using a stand mixer with a whisk attachment, beat the egg whites on a low speed with the cream of tartar until the mixture becomes foamy (kind of like a bubble bath). At this point, slowly pour in the white granulated sugar as the mixer is running. Add the vanilla extract and increase the speed to medium; continue to beat the mixture until a smooth glossy meringue with soft peaks has formed (kind of like shaving cream). Be careful to NOT over beat and dry out your egg whites. If you are coloring your macarons, add a few drops of the gel coloring a little bit before your egg whites have reached their soft and glossy peaks.

4. Prepare a pastry bag with a medium round tip (about 1 cm) and transfer the macaron batter into it. Pipe small circles onto the prepared baking sheets to make neat rows. Be sure to leave about 1 1/2 inches between each macaron. Grab the ends of the baking sheet and, while holding it level, firmly tap it on the counter a few times to get rid of any air bubbles. Allow the macarons to rest on the counter for 30-60 minutes before baking.

5. Preheat the oven to 295 degrees F and make sure the racks are in the middle portion. Bake the macarons for 15 minutes, one sheet at a time. Do not open the oven door at all! Once they are finished, allow them to cool for a few minutes; Gently peel away the silicone mat while lightly pushing the macaron cookies off. Repeat with the remaining trays of macarons.

6. Fill the macaron shells with blackberry jam and thick custard cream. Either spread both fillings on one shell, or jam on one and custard on the other.

For the filling:
Blackberry Jam
1/3 cup fresh blackberries
1/4 cup water
3 tbsp white sugar

1. Combine all of the ingredients in a small sauce pot over medium heat. Stirring often, bring the mixture to a low boil then reduce it to a simmer until the fruit breaks down, most liquid has evaporated, and the result is thick and gel like. Remove from heat and all it to cool.

Thick Custard Cream
1 cup whole milk
1 tsp vanilla extract
1/2 cup white sugar
1/4 tsp salt
3 egg yolks
3 tbsp corn starch

1. Whisk and combine the egg yolks and corn starch in a small-medium bowl. Set aside.
2. In a small sauce pot, combine the milk, vanilla, sugar, and salt. Bring the mixture to a low boil, stirring often. Turn off the heat and while whisking the egg yolk mixture constantly, slowly pour in about 1/3 of the hot milk. Whisk for about 30 seconds to 1 minute then pour the egg and milk mixture back into the original sauce pot with the remaining milk. Replace the pot onto the stove over low heat and continue to stir while bringing the custard back to a low simmer. Custard is done with it becomes very thick. Remove from the heat, pour the custard into a bowl, cover with plastic wrap directly onto the surface of the custard, and allow it to cool.


Thursday, April 12, 2012

Oh, Hey Tropical Blondies!


Whoops...sorry, not you guys. Nice tans, though!

I was saying "Hey!" to these tropical blondies-- white chocolate coconut blondies, to be exact!


Mmm...these have to be some of the most comforting baked goods. Buttery, moist, perfectly sweet with just the right amount of white chocolate and coconut. These blondies also can perform magic tricks! They have nailed down the disappearing act-- first they were in my baking pan, then several vanished within minutes!

I am sure if you ask them, they will gladly demonstrate the same magical performance for your belly. I mean, eyes.


White Chocolate & Coconut Blondies


12 ounces white chocolate chip cookies (divided use)
1 tbsp vanilla extract
2 tsp almond extract
1/2 cup unsalted butter at room temperature
1 1/4 cups all-purpose flour
2 eggs
1 tsp salt
1/2 cup brown sugar
1 1/4 cup unsweetened shredded coconut


Preheat the oven to 350 degrees F. 
1. Combine the butter and 8 ounces of the white chocolate chips in a glass bowl; place it over a pot of simmering water-- make sure the water is not touching the bowl (double broiler). Stir the chips and butter until it is melted and smooth. Turn off the heat and set the mixture aside to cool down. In small-medium bowl, combine the flour and salt-- set aside.


2. In large bowl, or stand mixer, beat the eggs together for about 3 minutes. Slowly add the brown sugar, vanilla extract, and almond extract while the mixer is still running on low-medium. Slowly pour in the melted white chocolate and butter mixture and continue to mix for another 1-2 minutes. Turn off the mixer and fold in the flour and salt mixture, in thirds, with a rubber spatula. Fold in 1 cup of the shredded coconut and half of the remaining white chocolate chips. 


3. Spread the batter evenly into a lightly greased 7 x 11 pan (or 9 x 9-- it doesn't really matter as long as you take into account depth and width to ensure you don't have skinny-mini or super thick blondies). Sprinkle the remaining white chocolate chips and shredded coconut over the top of the batter. Bake on the middle rack for 25-30 minutes or until a tooth pick comes out clean (opt for the lower end of the range for chewy blondies, but it will depend on your oven and pan size). Allow to cool for several minutes before cutting into bars and eating.

Tuesday, April 10, 2012

Wear What You Drink

It's been awhile, but you still need to wear what you drink!

It's spring (don't let the rain deceive you)! Wear this darling green "Scattered Limelight Dress" from Anthropologie (on sale now) while you sip and drink on this refreshing "Spring Breeze" cocktail from Teroforma: At the Table .

Sunday, April 8, 2012

Happy Easter!

Happy Easter! Which one of these eggs is not like the other?


With some leftover carrot cake and hazelnut buttercream, I made a mini Easter egg cake to celebrate yet another joyous reminder of salvation (and sweet tooth cravings and pastel colors). :)

Sunday, April 1, 2012

Nice Moves

This morning when I opened up my e-mail inbox, I was puzzled when I saw one from "Warby Barker". Yes, I said Barker...not Parker. I immediately chuckled at the images on the message-- several breeds of adorable dogs wearing glasses! I clicked on the link right away and the squeals only got louder! As soon as the site fully loaded up, I found myself questioning every link. Could these be the new "Doggles?" Warby Parker...you are a GENIUS! I'll take two-- one for each of my dogs. Oh, right...they don't need prescription frames. I'll just purchase frames from the Sunwear collection then. No problem!


Yes, I looked at every pair of glasses. Yes, I am sick! But, I wanted to see all the dogs! When do pooches ever get the opportunity to look hilarious and professional at the same time? Not often, I'll tell you that. :)

Every purchase comes with a gluten-free dog treat and free shipping. What a deal.

Yes, like I said, I am sick.


However, no worries, when you try to purchase (no, I really wasn't going to buy them...I'm not that nuts), Warby Parker let's you know it's all an April Fools joke. Ohhhh, nice moves, guys! My favorite and the most adorable AF joke, today.

Thursday, March 15, 2012

A Pink Birthday Cake...with Sparkle!

Check out my Desserts & Events page for more shots an information on Cecilia's 4th birthday!

DIY: Silk Flower Pomander

Sorry for the blogging absence, I've been too busy enjoying my spring break from work. You can't tell, but I am dancing. Right. Now.

So, what does this teacher do on her spring break vacation? I'll catch you up with some highlights from this week, so far:
1. Catered cake and cupcakes to a child's 4th birthday party.
2. Completed Sacramento's Shamrock'n'Half-Marathon for the second time. However, this time I ran the race with my brother!
3. Went on a hunt for affordable and stylish men's gray suits for the groomsmen in our wedding (it was successful).
4. Finalized details with my florist for the wedding (and shaved over 700 bucks off our total!)
5. Slept in.
6. Created Save the Dates for our wedding.
7. Slept in.
8. Got back in touch with my crafty side...thanks to my free time!
9. Baked delicious salted caramel and banana cupcakes for my fiance's coworkers.
10. Slept in.

Next week, we are celebrating our 5-year anniversary! This will be our last anniversary together while dating! I'm super excited for the mini-vacation we have planned-- a road trip to Monterey/Carmel for a few days, down towards Santa Barbara, and finally to L.A. to visit my family....AND pick up my wedding gowns (eeek!!).

Anyway, I mentioned that I met with my wedding florist and finalized a lot of details. One of the things I love about the floral plans we have going on is the addition of whimsical, modern, and elegant pomanders. Here are some of the inspiration photos I used to help create a look for our day:

via
via
via
via

I wanted to add pomanders to the alter, very much like the first photo, and also have some on every other chair along the aisle. However, the cost of real flower pomanders is pretty high.  I decided to add some lovely free flowing fabric to alter in a color that matches our scheme. To incorporate that style into the aisle, I thought I would take a stab at making silk flower pomanders. With time on my side this break, I figured I would make one and see how I liked it. I was a little hesitant to try them out at first since paper pomanders can look so tacky and cheap. I ended up liking the end result quite a bit...and so did my fiance! The trick is to make sure you use fabric that has some nice sheen to it and doesn't fray easy. I went with a silky feeling fabric that is typically used as lining inside garments (forgive me for not knowing the fabric name). Also, the whole thing took a while because I wanted to keep the "petals" close together. When they were spread apart, the pomander started to look like a loofa....uh no thanks.   

This is what my faux-floral pomander looks like: 

The color is brighter in the photo than it really is. Actually, it's more of a deep rose shade of pink. 


Here's a tutorial on how to make a silk flower pomander. It's time consuming, but not very difficult. To be honest, there are tons of these out on the web, but I thought it would be nice to start a DIY section on OMP!. Enjoy!

DIY Silk Flower Pomander

Materials:
-1 1/4 yard of fabric (go for something that has sheen to it and doesn't fray easily).
-pencil
-circular object or template approx 3-3.5" in diameter (for tracing)
-5" Styrofoam ball
-30" ribbon (this will end up making a 15" hang since you will be folding it in half; you can adjust this measurement to fit  your desired length)
-good fabric cutting scissors
-hot glue gun and extra sticks
-covered work area (in case hot glue drips out)
-coffee & a good movie (for your sanity)


*Note: I used between 75-95 cut circle pieces. I tried to keep track, but um, between watching movies and groaning at the long process...I lost count. :) 


Wednesday, March 7, 2012

Blackberry, Lemon, and Thyme "Power" Scones

To My Dearest Friend,

I know how busy your weekdays can be. I've seen you stumble out of bed after hitting the snooze 3-4 times followed by a mad rush to get ready and make it out the door on time so you're not late for work. Don't think I've forgotten about how many times you forgot to eat breakfast on the way out because your protein shake blender was dirty, you didn't have time to make oatmeal, or you had some other lame excuse (like you had to take 5 minutes to curl your hair). When you do that I get into the craziest moods at around 9:00 A.M-- I'm sure you've heard me growl at you (I get cranky, okay?).

You'd think after a few days like that during the week, you'd learn to treat me right. However, munching on a slice of whole-wheat bread with almond butter just doesn't always cut it-- neither does your desperate attempt for protein and carbs with your slice of turkey in a wheat tortilla! Sustanance- smushtanance! I need something that satisfies my taste buds, keeps me full, and is good for me and the rest of the gang (your waist and thighs say, "Hi").

 I hope by now, you see understand how awful this problem is. Well, I don't find it noble to complain without being proactive so, fortunately for you, I've provided you with a recipe for some Blackberry, Lemon, and Thyme "Power" Scones that are packed with protein, fiber, have plenty of "good" carbs, and are low in fat. They even have those chia seeds everyone has been talking about, which are supposed to be loaded with all kinds of nutrients your body can benefit from. Also, these scones taste delicious-- like summer in my mouth (well, your mouth), actually. Please make these today-- if you do, I'll see what I can do about not storing that ice cream you ate last night on your arms.

Yours Truly,
Belly


Blackberry, Lemon, and Thyme "Power" Scones
makes 1 dozen scones

2 cups whole wheat pastry flour
1 1/2 cups dark rye flour
1/2 cup chia seeds (grounding using a spice mill is optional)
3/4 cup brown sugar
1 tbsp baking powder
1 tsp salt
1 cup half and half
3/4 cup reduced fat buttermilk
1 1/2 tsp vanilla extract
3 tbsp  lemon zest
2 tsp chopped fresh thyme leaves
6 oz fresh blackberries
1/4 cup raw sugar

Preheat oven to 350 degrees F and prepare two baking sheets with silicone liners or parchment paper.

1. Combine the whole wheat pastry flour, rye flour, chia seeds, brown sugar, baking powder, and salt in a large bowl. Combine the half and half, buttermilk, vanilla, lemon zest, and thyme in another bowl. Pour the wet mixture into the dry ingredients and stir until just partially combined. 

2. Place the mixture onto a lightly floured surface. Flour your hands and knead it until the dough starts to form (it will be sticky). Flatten it out slightly and scatter 1/3 of the blackberries on top of the dough; gently fold and knead the dough again to combine-- repeat with the remaining berries. 

3. Form the dough, with your hands, into a 10 x 6 inch rectangle. Cut it in half down the length and then in thirds across the width. Cut each square in half diagonally to make triangles-- you should get 12 triangles. Transfer the triangles to prepared baking sheets with about 2 1/2 - 3 inches of space between each. Brush the top of the scones with a little half and half; sprinkle raw sugar over the tops of each. Bake the scones for about 30 minutes and rotate the pan halfway through the baking time. Scones should be golden brown; remove and let cool on a rack before eating. Store in airtight container(s).

*These scones are best when eaten within 2 days of baking-- any longer and they will tend to try out.

Sunday, March 4, 2012

Sweet & "Sultry" Cupcakes

Carrot cupcakes with orange-ginger cream cheese frosting topped with fondant "panties" and trimmed with black lace for a lingerie themed bridal shower. Read more and see additional photos here.


Thank You, Bearded Owl's Hoot!

This post is a big, warm, and fuzzy "THANK YOU!" to Lisa Marie of Bearded Owl's Hoots. You may remember my "Wear What You Eat" post last year with the Ellie Eternity Scarf and a scrumptious strawberry cupcake. Well, when Lisa saw that I featured her shop and item on OMP!, she contacted me and offered to send me a complimentary scarf. She's so sweet!

I just received my Ellie Eternity Scarf in clover green with the most thoughtful note including a completely unnecessary apology for a delay in sending out the package-- seriously, Lisa is a doll!

Although, it's getting warmer, I can't help but want to wear my hand knit scarf around all the time! It's incredibly soft and it's incredible length makes a great statement scarf in addition to keeping your neck (and more) warm.

Maybe my AC will get some loving action so I can wear it more...anything for a cute accessory, right? ;)

Sunday, February 26, 2012

A Little Mermaid Birthday Party

Whew! I just took a recovery nap-- much needed after working all day Saturday and into this morning getting desserts ready for my friend's daughter's 4th birthday party. I sure love dessert catering and I really enjoyed working on this adorable theme.


Read more about it and check out more photos on my Desserts & Events page.

Thursday, February 23, 2012

Seriously Good Soft Almond Butter Cookies

These almond butter cookies have two parts to their "seriously good" name description.
Part 1: Self-explanatory. Eat one and you'll believe me. 
Part 2: They are made with whole-wheat pastry flour, organic and all natural almond butter, and organic and         
raw sugars. With all the healthiness going on in these-- yes, they still are so delicious you may be tricked into   
feeling guiltier than you should when you take a bite (or eat 4 cookies in a row). Don't believe me? Please refer to the brief instructions in part 1. 


The recipe for these cookies was actually created "on the fly" on this last Sunday evening. My fiancé had a sweet tooth and wanted to go out for ice cream or to the store to hunt for something indulgent. I was feeling lazy and unmotivated to leave the house with him. As a result, I told him I would bake some cookies. Upon exclaiming this, I considered my options based on the ingredients I had at his house, drafted up a recipe and-- viola! Seriously Good Soft Almond Butter Cookies were born. 

Seriously Good Soft Almond Butter Cookies
makes about 1 1/2 dozen cookies

1/2 cup unsalted butter, room temperature
1/2 cup organic and natural almond butter
1/2 cup organic white cane sugar
1/4 cup organic brown sugar
1/4 cup honey
1 large egg
1 tbsp hazelnut liquor 
1 1/4 cup whole wheat pastry flour (make sure it is pastry flour)
1/2 tsp baking powder
3/4 tsp baking soda
1/4 tsp salt
about 1/2 cup raw sugar for rolling cookie dough in

1. Use a mixer to cream the butter, almond butter, white sugar, brown sugar, and honey until smooth. Add the egg and hazelnut liquor and continue to mix on medium speed until the mixture is well combined, smooth, and "fluffy".

2. In another medium sized bowl, sift and mix the whole wheat flour, baking powder, baking soda, and salt together. Slowly add these dry ingredients into the butter mixture in thirds. Make sure you add each sequential third just after the former is mixed in and does not appear "dry"-- don't over mix the ingredients. Once finished, cover the bowl with plastic wrap and chill in the refrigerator for at least 45 minutes. 

3. Preheat the oven to 350 degrees F. While the oven is heating up, prepare 2 baking sheets with silicone mats or parchment paper. Use a spoon to scoop some cookie dough and roll it into a 1" ball. Place the ball of dough into the raw sugar and gently roll it around to coat all sides. Place the sugar coated dough onto the prepared baking sheet; repeat with the rest of the cookies. Be sure to leave about 1 1/2 inches of space in between each cookie. Use a fork to gently press down on the cookies to lightly flatten and create a criss-cross pattern (it was hardly noticeable on most of my cookies; if you want a strong pattern be sure to press down more). Bake the cookies on the middle rack of the oven for 8-10 minutes or when they are golden brown and slightly darker around the edges.  Remove from the oven, allow to cool for 1-2 minutes, and transfer to a cooling rack. 


Friday, February 10, 2012

Earl Grey Infused Dark Chocolate Macarons

Lately, I've been on a Earl Grey frenzy. I love floral flavors such as jasmine, rose, and lavender; however, it wasn't until recently that I began to experiment with Earl Grey. The warm notes of bergamot in the black tea are so lovely I don't know why I didn't start sooner! Especially since my absolute favorite ice cream shop, Ici, in Berkeley, Ca serves up an amazing Earl Grey flavored scoop. Last week, I made these shortbread turned sandwich cookies and filled them with espresso ganache for a staff potluck. They were an absolute delight! Well, I don't have tea flavored shortbread sandwich treats for you today, but I do have something that may be a little bit better-- Earl Grey Infused Dark Chocolate Macarons.

Oh, hello, sweet tooth!


I made these a few days ago and they were actually a gift for the mother of one of my students in my class. She's an amazing mom who recently went the extra mile to help out in my classroom with something for our school's annual crab feed fundraiser. How do you thank a supportive working mother who has three kids (fabulous kids, by the way) that still finds the energy to put several long hours into work for a project for two fifth grade classes? I thought I would start with a present from my kitchen. That was the cue for these bite size indulgences to enter the picture-- ta da.


Macarons packed gently away in a glass jar and wrapped with a little bit of sparkle, rafia, and a sweet silk ivory flower. This was such an enjoyable "thank you" to make.

Earl Grey Infused Dark Chocolate Macarons
For detailed tips and helpful links see here.


100 g aged egg whites (aged= resting in an air-tight container in the fridge for 3-5 days)
1 tsp cream of tartar
28 g white granulated sugar
125 g finely ground almond meal (Bob's Red Mill makes a great one)

3 tbsp dutch processed cocoa powder
contents of 1 Earl Grey tea bag (about 1 tbsp)
225 g powdered sugar*
1 tsp real vanilla extract
1 serving of brewed Earl Grey tea


dark chocolate ganache (recipe follows)

Prepare two baking sheets lined with silicone mats (or parchment paper if you don't have these).

1. Combine and whisk together the almond meal, cocoa powder, Earl Grey tea leaves, and powdered sugar. Set aside.

2. Using a stand mixer with a whisk attachment, beat the egg whites on a low speed with the cream of tartar until the mixture becomes foamy (kind of like a bubble bath). At this point, slowly pour in the white granulated sugar as the mixer is running. Add the vanilla and increase the speed to medium; continue to beat the mixture until a smooth glossy meringue with soft peaks has formed (kind of like shaving cream). Be careful to NOT over beat and dry out your egg whites. 


3. Remove the bowl from your stand mixer and add 1/3 of the almond meal and powdered sugar mixture. Gently fold together just until everything is combined. Repeat with the next 1/3 of the dry ingredients and again with the final 1/3.

4. Prepare a pastry bag with a medium round tip (about 1 cm) and transfer the macaron batter into it. Pipe  straight down to make small circles 
into neat rows onto the prepared baking sheets. Be sure to leave about 1 inche between each macaron. Grab the ends of the baking sheet and, while holding it level, firmly tap it on the counter a few times to get rid of any air bubbles. Allow the macarons to rest on the counter for 30-60 minutes before baking.


5. Preheat the oven to 295 degrees F and make sure the racks are in the middle portion. Bake the macarons for 15-16 minutes, one sheet at a time. Do not open the oven door at all! Once they are finished, allow them to cool for a few minutes; Gently peel away the silicone mat while lightly pushing the macaron cookies off. Repeat with the remaining trays of macarons.

6. Once cooled, lightly brush the back side of each shell with a coating of brewed Earl Grey tea. Fill the macarons with the dark chocolate ganache (recipe as follows) by piping a small dollop onto the back side of one macaron shell and sandwiching it together with another. Repeat with the rest of the macarons. If not consuming right away, store them in an airtight container and keep them in the fridge.


Dark Chocolate Ganache

10 ounces dark chocolate, chopped or chips (60% cocoa content or higher)
1/2 cup heavy cream
1/2 tsp vanilla extract

1. Bring the heavy cream to a low boil in a small sauce pot on medium heat-- stir often to avoid cream from burning.
2. In a medium mixing bowl, pour in the chocolate and cream. Use a whisk to mix everything together until the chocolate becomes glossy and smooth.  Stir in the vanilla. Allow the ganache to cool for 6-10 minutes before piping onto the macaron shells. 
*3. If you have leftover ganache, stick it in the refrigerator and make truffles! :)