Thursday, May 30, 2013

Lemon Poppy Seed Cakes with White Chocolate Buttercream

When I am a guest at someone's house, I find it important to bring something over. When the occasion is dinner...you can count on me to bring dessert as my contribution.

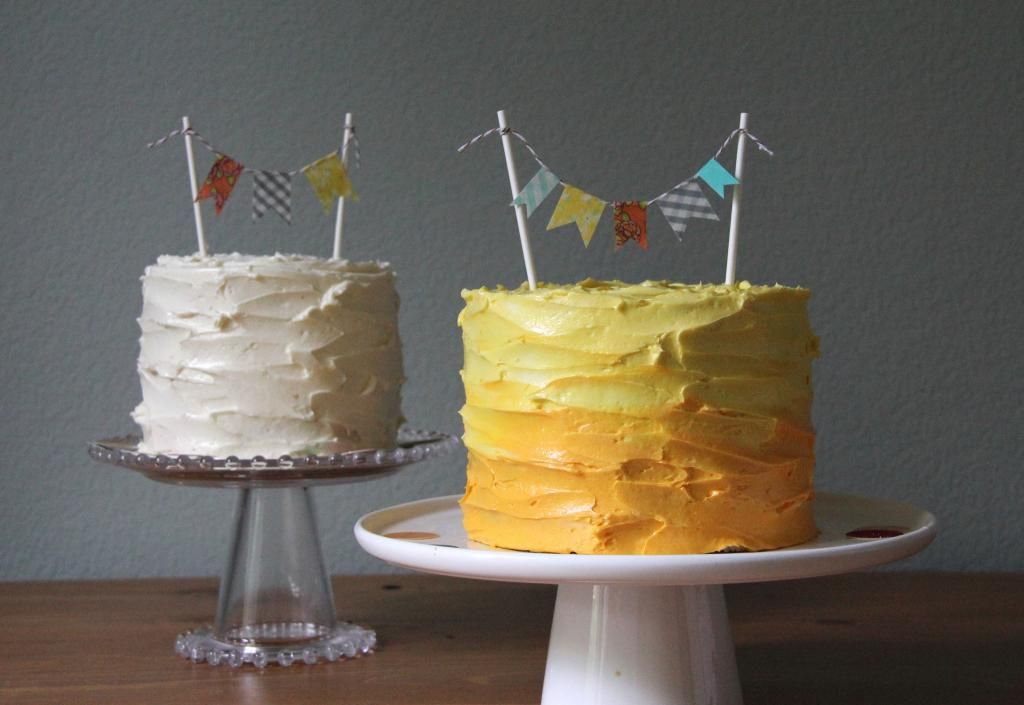
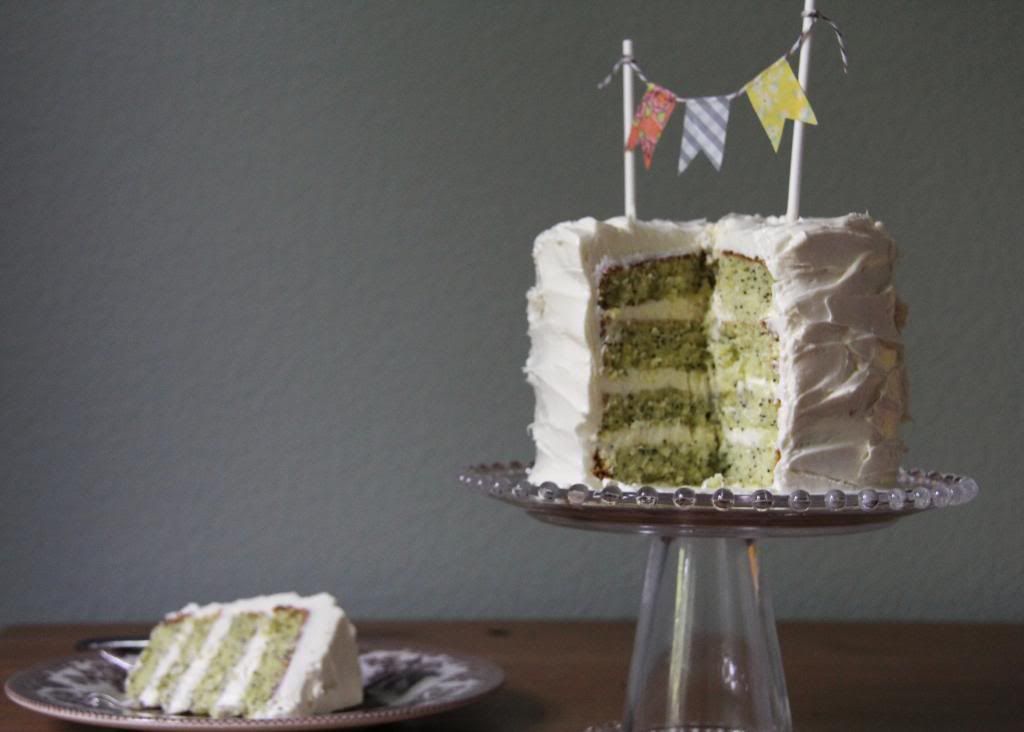
Last night, Henry and I went over to one of our pastor's house for an evening meal and I was excited to have an occasion to bake a cake. However, instead of just baking one cake, I made two-- one for dinner, and one to cut into for the blog. 

Too much cake? 

No. 

Unless,  you count eating some when I sliced the smaller cake...and then enjoying some more at dinner, again.
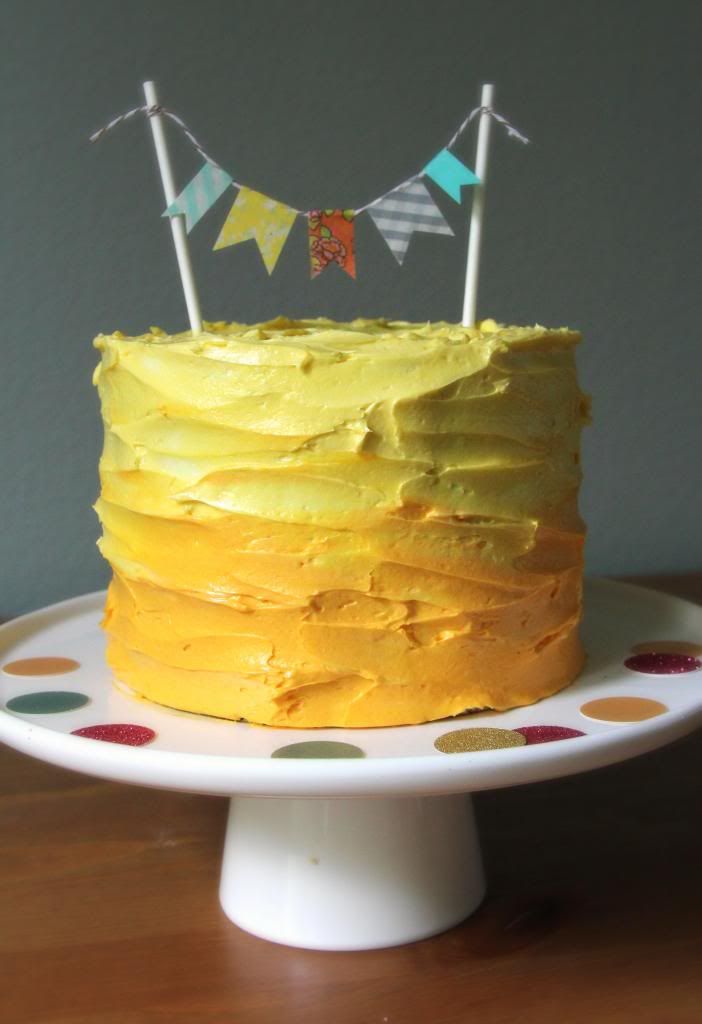
Err...okay, I guess I have to admit to maybe having too much cake for one day. However, with Lemon Poppyseed Cake Frosted with the silkiest White Chocolate Buttercream...how could I resist? I just couldn't! The crumb of the cake is moist yet firm. It has a classic flavor that is very similar to the perfect Lemon Poppyseed Muffins you may find at a good coffee house...except it is just a bit more delicate. 
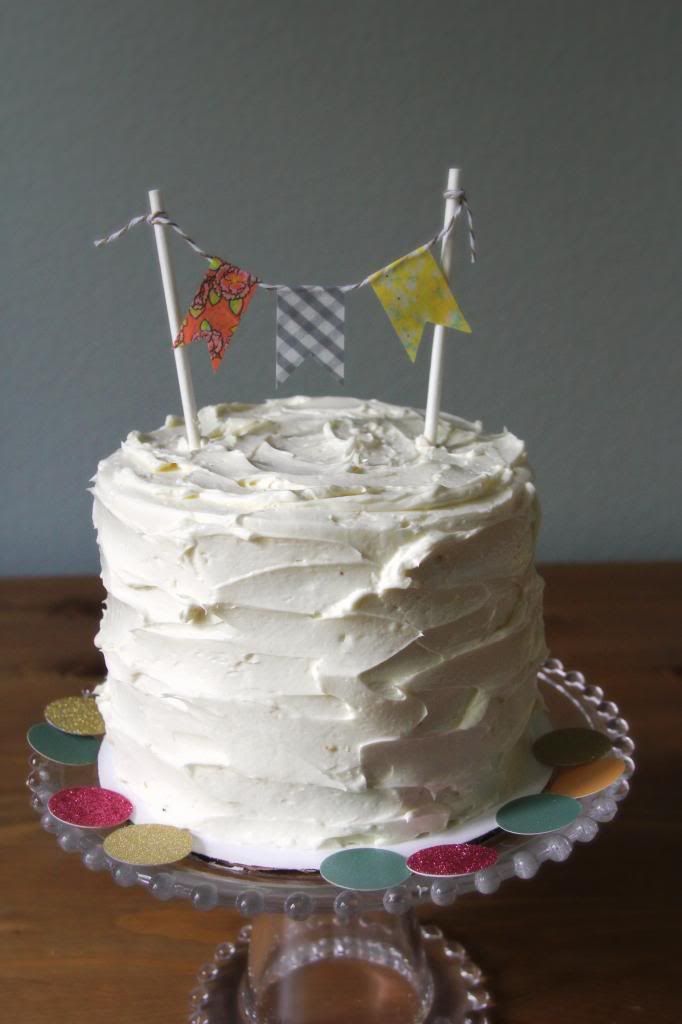
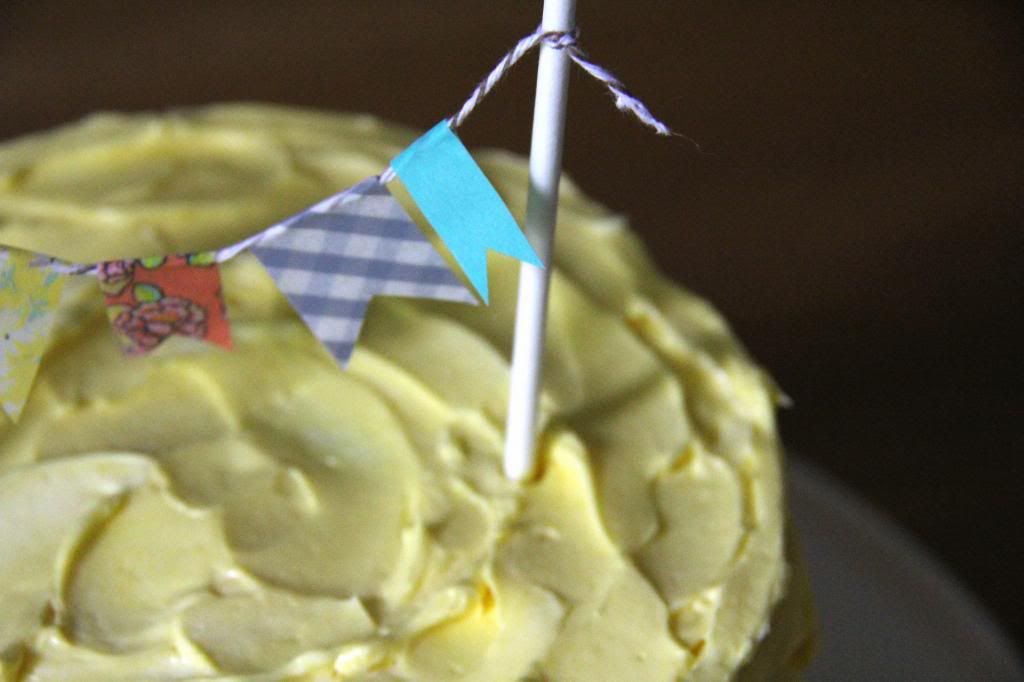
With such a vintage and classic taste, I decided to give it a charming and rustic look. I crumb coated each cake before using my spatula to make effortless streaks across the sides and top for an easy, yet adorable finish. To top it off, I made bunting banners with lollipop sticks, bakers twine, and assorted Washi tapes.

Mmm...I just love having reasons to bake and decorate a cake! Cheers.

Lemon Poppyseed Cake
adapted from this recipe
Makes one two-layer 8" cake

2 cups all purpose flour
1 3/4 cup white sugar
4 tsp baking powder
1 tsp salt
1/4 cup poppy seeds
1 1/2 sticks unsalted butter (room temp.), cubed
1 cup milk (room temp.)
5 egg whites
2 large eggs
zest of one large lemon
2 1/2 tsp lemon oil/extract
1 tsp vanilla extract
1 1/2 tsp almond extract
2 tbsp canola oil

1. In a stand mixer with the paddle attachment, mix the flour, sugar, baking powder, salt, and poppy seeds on a low speed for about 3-4 minutes until everything is well combined. Add the butter cubes little by little and continue to mix on medium-low for about 2 minutes.

2. While the dry ingredients are mixing, whisk together the milk, egg whites, eggs, lemon zest, lemon oil, vanilla, and almond extracts in another bowl. When the dry ingredients are ready, slowly pour all, but a 1/2 cup, of the wet ingredients into the bowl (flour/butter mixture). Beat everything together on medium speed for about 2 minutes. Add the rest of the milk mixture and beat for another minute. Pour in the canola oil and use a spatula to fold it into the batter until it is well incorporated.

3. Divide the cake batter, 2/3 full, into two 8" prepared cake pans that have been buttered and lightly floured. Bake at 350 degrees F. for 30-35 minutes-- a toothpick should come out clean and the sides should be a light golden brown. Allow the cake to cool completely before frosting.

*Note: Instead of baking an 8" cake, I used this recipe and divided it between two 6" and two 5" cake pans. Since I modified the size of the cake, I had to adjust the baking time. Here is a great chart to use as a reference when changing bake times-- the 6" cakes baked for 30 minutes and the 5" cake baked for  about 25 minutes. 

White Chocolate Buttercream Frosting (Swiss Meringue Based)
Makes about 10 cups -- store extra in a sealed airtight container in the refrigerator (when using leftover, bring to room temp. and whip up again before frosting other cakes).

1/2 cup heavy whipping cream
8 ounces white chocolate chips
10 large egg whites
2 cups white sugar
3 cups unsalted butter, cubed
2 tsp vanilla extract

1. In a small sauce pot, bring the heavy cream to a boil-- make sure to stir constantly to avoid burning the cream. Once it comes to a boil, immediately turn off the heat and pour the cream over the white chocolate chips (in a medium bowl). Use a rubber spatula to slowly mix the hot cream and white chocolate together until all the chips have melted. Once the ganache has come together, allow it to come to cool before using in the buttercream.

2. Use a double boiler, or place a large stand mixing bowl over a pot of simmering water (make sure the water doesn't touch the bowl), to heat the egg whites and sugar. Whisk this together constantly until the temperature reaches about 160 degrees F-- about 8-10 minutes when the sugar is dissolved, egg whites are hot, and everything is foamy.

3. Turn off the heat and transfer the bowl to the stand mixer. Use the whisk attachment and beat the meringue on high until it becomes thick, glossy, and the bowl feels neutral to the touch. As soon as the bowl is cool enough, reduce the speed to medium low and slowly add the butter and then the vanilla extract. The buttercream may appear chunky and curdled, but if it does, continue beating and everything will come together. The frosting should be smooth and thick.

4. Slowly pour in the cooled white chocolate ganache and continue to beat the buttercream for 1-2 more minutes on medium-high so everything gets mixed together well. If using food gel coloring, add now and mix until the color is even.

To assemble the cake
1.  Level and torte each cake layer.
2. Place one layer onto a sized cake board, add about 1/4 cup of buttercream on top, and use a spatula to spread it evenly across.
3. Place another layer on top and repeat the filling process. Continue this until you have reached the top layer.
4. Once the cake is filled and leveled, crumb coat and/or frost as desired.

Tuesday, May 28, 2013

Strawberry-Almond Pancakes with Fresh Ginger Berry Compote

Yesterday, I made the best strawberry pancakes I have had, yet! Hubby and I wanted to use the holiday time off to have one of our favorite traditions-- pancake breakfasts. This was a meal I had been looking forward to all weekend and I absolutely did not cut any corners. These are fluffy, buttery, and a little nutty from the almond. Although I am a huge fan of healthy and low-fat pancakes, this was a day for me to take out the butter and all-purpose flour and use it without a single ounce of remorse.
And, well. Let's just say there were no guilty feelings involved after I devoured my berry pancakes at breakfast.
And again at lunch (pancakes are my weakness!).
Too much? Uh...don't think so. :)

Strawberry-Almond Pancakes
modified and adapted from here
serves 2 (makes about six 6" pancakes)

1/2 cup all-purpose flour
1/2 cup almond flour/meal
1 1/2 tbsp white sugar
1 tsp baking powder
1/2 tsp baking soda
1/2 tsp salt
1/2 tsp ground cinnamon
3/4 cup milk (I had 2%)
2 tbsp apple cider vinegar
1 large egg
1 tsp almond extract
1/2 tsp vanilla extract
3 tbsp unsalted butter, melted
1 cup sliced/roughly chopped strawberries

1. In a bowl, whisk together the flour, almond flour, white sugar, baking powder, baking soda, salt, and cinnamon. Set aside.

2. In another bowl, combine the milk and apple cider vinegar. Allow this to sit for a few minutes and then whisk in the egg,  almond extract, vanilla extract, and melter butter.

3. Pour the dry ingredients into the wet ingredients; use a fork to gently stir everything together. It is important not to overmix and still have a lumpy batter-- just make sure there are no longer any "dry patches" of flour.

4. Ladle about 1/4 cup of the batter onto a nonstick, or greased, griddle/skillet on medium heat. Place several strawberry pieces onto the pancake while the other side is cooking. Once the edges start to bubble and thicken (about 4-5 minutes), use a spatula to flip the pancake so the other side can cook for an additional 3-4 minutes. The pancakes should be golden brown and slightly crisp on the edges. Serve with Fresh Ginger Berry Compote (or maple syrup!).
Instead of just topping my stack of pancakes with the compote, I spread a little in between each one to get a little more berry in every bite. 

Fresh Ginger Berry Compote
makes about 2 cups
4 tbsp unsalted butter
1 cup fresh blueberries
1/2 cup fresh roughly chopped strawberries
1/2 cup fresh blackberries
1/2 cup fresh raspberries
1 1/2 tsp freshly grated ginger
1/4 + 1 tbsp white sugar
zest of one lemon

1. In a small sauce pot, melt the butter on medium heat. Add the berries, ginger, sugar, and lemon zest. Stir gently (the raspberries will fall apart easily, but you don't want to break all fruit completely apart) and continue to cook on medium-low for about 8-10 minutes. Spoon over your pancakes (and save the leftovers to serve over ice cream or other desserts).

Monday, May 27, 2013

In Memoriam

Memorial Day isn't just about a nice day off from work (or school). Although the free time is ideal for making berry pancakes with my hubby (recipe will be shared tomorrow is listed here), it's truly about remembering all the men and women who honorably served and lost their lives while fighting/serving for our nation.

So, with that said...I am grateful! Happy Memorial Day, folks.


What's in a Donut?

What makes a donut truly a donut?
 For starters, it's the crispy and golden fried delicious bundle of sweet dough. Okay, who am I kidding? That's exactly what makes a donut a donut and, truthfully...the only thing that really matters. I've tried lots of baked donut recipes and although they were all quite delicious and satisfying, they never really hit the spot like a real donut would.

However, although a minor aesthetic attribute, a yummy donut typically is delightfully glazed or frosted with the finest form of a liquid sugar rush-- the icing! Although my favorite donuts are the dense and cakey "Old Fashioned" kind, I do have a soft spot for the classic donuts with icing and sprinkles as they were childhood love.

Here is my homage to donuts holding only the finest of qualities-- classic, colorful, and cheery.
Donut sugar cookies! Adorable, right? I smile just looking at them! They are just like the dozen my dad used to bring home on Saturday mornings when my brothers and I were children.
That royal icing on the "Chocolate Donut" looks deceptively like real chocolate glaze. I took two tastes and kept expecting it to taste like chocolate, but then realized I was just a silly baker who was playing mind games on herself. Fake chocolate icing and fake donuts. Sigh. If only when I bit into one of these "donuts" they would truly taste like donuts. That would be magical.

And worthy of a Nobel Prize. Maybe.


Sunday, May 26, 2013

Wear What You Eat

Wear this charming and sweet red Silk Waterflower Dress by Madewell (on sale now!) and eat this heavenly looking Strawberry Cake by Eat Already!.

Gah! This adorable red dress immediately reminded me of strawberries and made me yearn for summer. I love it and I can't wait to try this scrumptious Strawberry Cake recipe...mmm mmm.

On a side note, I have decided to make a modification to my weekly Wear What You Eat features here on OMP!. I enjoy posting these features as they allow me to browse and explore through all the incredible food blogs out there. Pairing food with fashion is one of my quirky and creative outlets, I suppose. I wanted utilize this feature to also explore all the great little shops and independent artists on Etsy-- there are so many great finds created by talented people! However, it's been really challenging to limit my "wears" with my "eats" when they have been limited to just one site. With that sad, Wear What You Eat will now incorporate its fashion pairings from wherever my little heart desires (Etsy is still included). I just broke my own rules, but I am so very excited-- let's be real...I am truthfully inspired by fashion everywhere. For food...and my own closet. Wink.

Just a Humble Ant

A little over a month ago, my friends, husband, and I went away to Yosemite for a weekend getaway. The weather was incredible, the company was grand, and the view surrounding my every location that weekend was breathtaking.
My car ride there, with my hubby, was typical of most of our trips-- filled with good music, conversation, and a lot of falling asleep (on my part). However, as we grew closer and closer to our destination and began to take the drive up and through the mountains, I found myself speechless and quite humbled at my surroundings.

I can't recall the last time I was in the presence of so much pure and glorious nature-- it was most likely when I was still a child. That weekend, I sat in my passenger seat, while Henry drove, and I remember staring out through the windows as I examined what seemed like each and every passing tree and rocky slope. My eyes surveyed how tall and confident everything seemed to stand-- it seemed as if every element in the valley was presenting itself in the most grandiose way possible. This ride alone left me in complete awe!
Just when I thought the Yosemite Valley could not get any more beautiful, an 8-mile hike deep into and up the the mountains and trails proved me wrong. When you're climbing up a mountain through forests and alongside tremendous waterfalls, the beauty just amplifies.

The whole weekend seemed to go by quickly and before we knew it we were back home. However, being in the natural presence of such pure and absolute beauty left quite an impression on my heart. I don't know how to really describe how I felt better than with the word, "humbled".

I was humbled by how vast and grand the world beyond my little bubble of a life in my quaint suburban home was. Although, I am and was well aware of this, I felt that this realization was just infinitely stronger when I was actually face-to-face with such incredible nature. It made me contemplate the fact that it is so easy to get caught up in my life. It's easy to feel that everything revolves around me. The daily routine of life and all of the trials and tribulations along the way often leave me mentally preoccupied. However, when I stopped and took a minute to soak in the world and cast my eyes on the remarkable and perfect elements of our Earth, I was reminded that there is so much more to life. I was humbled by the greatness of my surroundings and felt so tiny in comparison. There I was in the middle of one of God's perfectly created pieces of work in nature and I was nothing but a speck in the frame.

I was left humbled thinking about my teeny tiny self with my itty bitty life. Sure, my existence is essential and of course I try to live each day to the fullest. But, any problems, worries, troubles or hurdles I may encounter are like crumbs compared to the rest of the world. I know God cares about my woes and loves me unconditionally, but when it comes down to it allowing myself to stress and worry is pointless. What may seem like the iceberg to my Titanic of a life is really just like a little ant in a field of grass. In reality, my whole existence is just like that ant; I'm just crawling and living in this big, big world.

It's not all about me. It's all about Him. It's all about the world around me. It's all about remembering to be humble and thankful to be included, even as a tiny ant, in this majestic work of art that He has created.


Wednesday, May 22, 2013

Mint Mojito Iced Coffee

We've all had our moments with food. You know, the kind of moment where you connect with whatever you're eating or drinking in a way that is so incredibly pleasing and emotional. In my experience, these are the times when I can't stop making obnoxious, "MMMM!!" sounds, my taste buds are shocked because they have just been run over by the flavor bus, and my serotonin levels are crashing through the roof. Typically, such intimate foodie moments occur when there is an intriguing mix of diverse and unexpected flavors and/or textures in whatever I am enjoying.

It's these foods that leave those special imprints on my heart. *Insert dramatic love song here*

With beverages, these passionate moments have been sparse in comparison to those from dishes and desserts. However, the following beverages have elicited such a rush of foodie intimacy in the last few years:

1. Chocolate Thai Iced Tea - Bittersweet Cafe, Berkeley, Ca
A friend took me here and raved about this drink. After trying my first sip, I felt like I had been missing out on life. This beverage takes a twist on a typical Thai tea with it's deep and rich chocolaty addition.
2. White Linen Cocktail - Shady Lady Saloon Bar, Sacramento, Ca
I love gin cocktails-- they are by far my favorite. This cocktail is pleasantly refreshing with a combination of fabulous gin, simple syrup, and cucumber. Shady Lady has the best cocktails and I have tried several, but the White Linen always takes the cake.
3. Bowl of Soul - Naked Lounge, Sacramento, Ca
This beverage is a steaming cup of chamomile tea brewed with foamy soy milk, a little honey, and a bit of shaved dark chocolate. The flavor combinations are sensational and remind me of the comforts of sleeping in on a relaxing Saturday morning.
4. Mint Mojito Coffee - Philz Coffee, San Jose, Ca
Silicon Valley and Bay Area residents-- I don't need to remind you of how good Philz is. My brother took me for my first cup of this Mint Mojito a few years back and now I crave it all the time. Minty, creamy, and full of bold roasted coffee. It is theeeee best.
5. Frank Sinatra (Blueberry Mocha) - Cantata Coffee Co., San Francisco, Ca
I stumbled upon this place by accident with my good friend while in the city. I was curious about the combination of blueberry, chocolate, and coffee. However, if Philz taught me anything, it's to go for the unexpected flavors in coffee drinks. I am so glad I went for this Frank Sinatra! It tasted like chocolate covered blueberries in my coffee...yum! This actually inspired my Blueberry Mocha Brownies recipe.

Mmm...the thought of all of these leaves me feeling parched and a little over-caffeinated. I just love my coffee...and gin, I suppose!

Instead of dreaming about one of my favorite coffee drinks, I decided to try to recreate it at home. Yep, I brought #4: Philz Mint Mojito Coffee into my kitchen.
I can't say it's the same, but it is most definitely delicious and temporarily settles the Philz void I have going on. Best of all, it is super easy to make for a good-morning-start (or anytime of day).
Mint Mojito Iced Coffee
Inspired by Philz Coffee
serves 1 (but you can easily multiply the amount of each ingredient if you are trying to make a larger batch of servings)

about 1/4 cup of loose mint leaves
8 oz. (1 cup) brewed dark roasted coffee (or espresso)
2 oz. (1/4 cup) creamer (I used French vanilla fat-free half-n-half)
ice

*Note: Creamer with flavorings tend to be a bit sweet for my liking. Next time I would probably use regular half-n-half and add some vanilla extract for flavor. You could easily do this and control the amount of sweetness by adding however much sugar you want. 

1. Leave a sprig of mint leaves aside for the garnish. Take the rest and muddle them into the bottom of a glass (we don't make cocktails a lot in our house so I used my small fondant rolling pin-- makeshift bar tender tools is my forte).

2. Pour in the coffee and creamer. Stir well and then fill the cup with ice. Stir again. Garnish with the reserved mint and enjoy!

via

Saturday, May 18, 2013

Lobster Love

Last night we had special visitors over for dinner. And by visitors, I mean dinner guests. We ate them.
Would you like to come over for dinner at our place sometime? 

Okay, in all honesty, we did have special guests on our dinner plates-- lobster tails! I love lobster, but have not had it cooked out of a home kitchen in years. Yesterday Sprouts had a sale on them for $7 each. I couldn't pass the deal up.

The whole process of prepping, cooking, and then eating the lobster put me in a "Friends" mood (although I have yet to ever turn down an episode) and I was walking down Ross and Rachel's memory lane."Friends" fans, you get me-- I know you do.

Broiled Lobster Tail
Note: This method uses a scant amount of butter compared to most recipes for lobster preparation-- the results are still fabulous. However, if fancy dousing your lobster tail in golden clarified butter, I don't see how your taste buds would be at a loss.

lobster tail
1/2 tbsp unsalted butter
1/2 tbsp olive oil
1/4 tsp pepper
1/4 tsp salt
1/2 tsp paprika
fresh lemon
*this is for a single tail; adjust recipe according to your quantity

1. Prepare your lobster tail by using kitchen shears to cut straight down the shell. Pull apart the shell and carefully pull out the flesh of the tail until it comes out (or stop when there is just a little piece still attached). Replace the removed flesh on top of the shells and fold the loose meat, on the sides, over the edges.
For a great demonstration of how to properly prepare a lobster tail, read this information.

2. Season the tail with the pepper, salt, and paprika by sprinkling the seasonings over it. Place half of the butter amount on top of the prepared lobster tail, drizzle the olive oil all over, and place it in the broiler on the middle rack. Cook for 8-10 minutes. When finished, remove from the oven, rub the remaining butter over the tail, and squeeze a fresh wedge of lemon on top.


Thursday, May 16, 2013

DIY: Scalloped Paper Garland

Garlands are such a fun way to decorate for events, parties, or just because you love them. They are a creative and whimsical way of brightening up a focal space or area. For an event I am hosting this weekend, I created these super easy Scalloped Paper Garlands and I thought I would share how I made them.

Materials
paper of choice (I used various types of cardstock and scrapbook paper)
circle cutter (or scissors)
     -You will need to cut your paper into circle sizes of your choice. I made a few garlands with   
      different sized circles: 4.5", 5.5", and 7.5" diameters.
glue stick
string (I used a roll of acrylic crochet yarn-- it is lightweight and doesn't fray much)
Instructions
1. Cut a piece of string to whatever length you want. If it's for a specific location or space, you should measure the length and plan accordingly. I created these for my backyard patio and I wanted various lengths to create a layered look; each of my garlands are different lengths. I suppose you could get mathematical and more precise, but it didn't matter to me.

2. Fold each of your cut paper circles in half to form a semi-circle.
2. Apply glue to one half of the circle.
3. Take your string and place it along the fold of the inside of the circle. Make sure you leave a few inches at the end of the string so you can make a loop for hanging the garland later.
4. Repeat with more circles until you reach the stopping point on your string-- remember you want to save a few inches at the end. Also, I left a few inches in between each scallop on my garlands. The amount of space here is entirely up to you...you could even place them right next to each other if you wanted. However, I think it would make it a little harder to allow them to hang freely as there wouldn't be much room to bend in between the scallops.  Again, if you wanted to be mathematical and precise and measure the length of your string, diameter of your circles, and space in between to attain an exact number of inches and circles to place on your garland you can...but it wasn't a big deal to me. Eyeballing it worked out fine and kept me stress and obsessive free. :)
5. To finish your garlands, take hold of the end of the string, make a loop, and tie a knot. This will allow you to anchor the garlands on nails or hooks (but surely you could just use tape if you'd like).
Done!
I love the mix of soft and glittery colored scallops on these garlands. Although, I know it's hard to see the sparkle on these photos. I can't wait to deck out my patio this weekend with these! They're so whimsical and fun. If you plan on making these, you might want to know that although they are super easy to make, they are tediously time consuming-- especially if you want long garlands. I spread the task of creating these over the span of a few days.

Catching up on Mad Men and watching Don Draper walk around in a grade-A suit helped pass the time. Wink.

Wednesday, May 15, 2013

Raspberry-Coconut Macaroons

Okay, first...let's get one thing cleared up. 
When it comes to macaroons and macarons, there seems to be a lot of confusion. I mean, everyone seems to know what each cookie is individually and it is nearly impossible to confuse them for each other in sight or taste, but their names are often mixed up-- a common error.

Macaroons are the simple and always satisfying coconut confection. Typically, it is made with a mixture of shredded coconut, egg whites, and some sort of sweetening agent (condensed milk or sugar).

Macarons (pronounced MAC-A-RON) are the delicate and intriguing French meringue based cookie-- an older, more elegant, and more pristine big sister of our average sandwich cookie. 

This is a mistake that I myself made years ago until I was properly informed. I remember feeling so silly asking for a, by definition, chewy coconut cookie when I wanted a delightful burst of sugar and joy in the form of a round and pretty French treat.

Alright, alright. Now that that's settled, let's move on to these dreamy Raspberry-Coconut Macaroons.
Last evening, I went back and forth staring into my cupboard and refrigerator thinking of a dessert to make for a potluck (it took place this afternoon). I wanted to contribute something that wasn't too sweet or decadent, yet still hit the spot. Well, it was a good night for recipe brainstorming and creating because these little bundles of joy surely fit the bill. 

Chewy. Slightly tart and fruity. Perfectly sweet. Finished with robust dark chocolate. Pink and oh-so cute!

Hello-oo Raspberry-Coconut Macaroons!

Raspberry-Coconut Macaroons
makes 15 macaroons

1/2 cup fresh raspberries 
2 cups unsweetened finely shredded coconut (if you can't find finely shredded, the regular kind will do...or you could even give it a few pulses in the food processor) 
2 1/2 tbsp coconut flour
2/3 cup white sugar
3/4 tsp salt
1 tsp vanilla extract
3 egg whites
8 oz dark chocolate (I prefer 65% or more cacao content...the dark chocolate flavor provides a good balance of sweetness)

1. In a bowl, whisk together the shredded coconut, coconut flour, white sugar, and salt.

2. In another bowl, use a fork to mash up the raspberries until there are no longer any large clumps of fruit. Pour in the dry coconut and sugar mixture and use a spatula to fold together the ingredients.

3. Lightly whisk the egg whites, with the vanilla extract, to a light foamy stage. Pour in the egg whites into the raspberry and coconut mixture; use a rubber spatula or fork to thoroughly combine everything.

4. Use a mini-ice cream scoop, or tablespoon, to scoop out rounded portions-- really pack in the scoop so each macaroon is squished together and holds its shape. Place each round on a baking sheet lined with parchment paper. Bake at 300 degrees F. for about 25 minutes. The macaroons should be golden brown on the bottoms and just around the edges. Remove from the oven and allow them to cool.

5. Melt the dark chocolate in a bowl, either on a double broiler or in the microwave in 30 second intervals. Gently dip the bottoms of each cooled macaroon into the chocolate-- make sure the bottoms and a little of the bottom edges are coated-- and then place them back on the parchment paper. Dip a fork into the chocolate and drizzle more chocolate across the tops of the cookies. If desired, sprinkle a little more unsweetened coconut on the top of each macaroon. Allow the chocolate to cool and harden before serving (or if you're lazy like me, pop them in the fridge for a speed-chill).


Sunday, May 12, 2013

Wear What You Eat

Let your little girl wear these insanely adorable Orange Satin Ballet Flats from Baby Souls. Eat these Orange Creamsicle Truffles, a delightful twist on white chocolate confections, from On Sugar Mountain.

Happy Mother's Day

 What a blessing to have a loving and caring mother! On this Mother's Day, I am reminded of all the lovely things I appreciate about my mama.

Happy Mother's Day to all you mama's out there! 

Friday, May 10, 2013

The Princess of Cookies

 If my husband was a cookie, he would be one of those giant-bigger-than-your-head cookies. Chewy, but crispy on the outside. Perfectly sweet with chunks of good dark chocolate and bit of spice. There would also be a light sprinkling of sea salt on top (because he is interesting and funny like that). Why would he be this type of cookie? Is it because these are my favorite kinds or each ingredient has some deep symbolic meaning paired to his great qualities? Is it because I just really want a cookie right now? Hmm...

Anyway, this post isn't about my sweet and perfect-cookie-like hubby. (Sorry, babes.)

This post is about princesses. Yes, princesses. If they could be cookies, they would be these beautiful  sugar cookies decorated with brush embroidery. Now, these are sugar cookies...so although more fancy and delicate looking, they're more of your casual-no-big-deal-I'm-royalty kind of cookie. 

Similar to Anne Hathaway in Princess Diaries circa 2001 and my eighth-grade year of school.

 Sigh. Pretty and lovely aren't they?

This was just my second time using brush embroidery to decorate sugar cookies. I can't wait to practice more in the near future-- such an easy and elegant way to spruce up a simple treat.
 Don't worry, Princess Mia-- the cookies were surprised they were princesses, too.

For a great tutorial on how to use the brush embroidery technique to decorate sweets, you can check out this excellent video. The type of brush you use will yield different results, but the technique still presents lovely details.