


Thursday, March 15, 2012

DIY: Silk Flower Pomander
Sorry for the blogging absence, I've been too busy enjoying my spring break from work. You can't tell, but I am dancing. Right. Now.
So, what does this teacher do on her spring break vacation? I'll catch you up with some highlights from this week, so far:
1. Catered cake and cupcakes to a child's 4th birthday party.
2. Completed Sacramento's Shamrock'n'Half-Marathon for the second time. However, this time I ran the race with my brother!
3. Went on a hunt for affordable and stylish men's gray suits for the groomsmen in our wedding (it was successful).
4. Finalized details with my florist for the wedding (and shaved over 700 bucks off our total!)
5. Slept in.
6. Created Save the Dates for our wedding.
7. Slept in.
8. Got back in touch with my crafty side...thanks to my free time!
9. Baked delicious salted caramel and banana cupcakes for my fiance's coworkers.
10. Slept in.
Next week, we are celebrating our 5-year anniversary! This will be our last anniversary together while dating! I'm super excited for the mini-vacation we have planned-- a road trip to Monterey/Carmel for a few days, down towards Santa Barbara, and finally to L.A. to visit my family....AND pick up my wedding gowns (eeek!!).
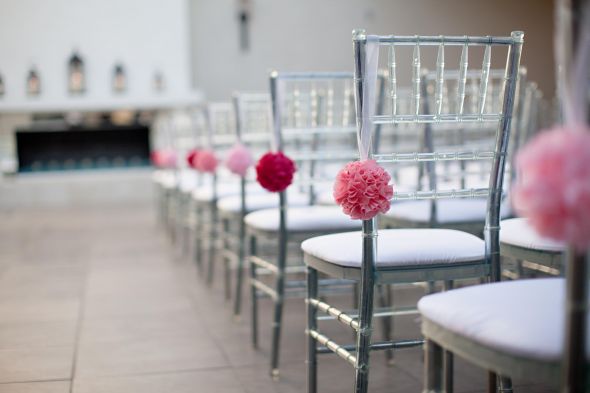
Anyway, I mentioned that I met with my wedding florist and finalized a lot of details. One of the things I love about the floral plans we have going on is the addition of whimsical, modern, and elegant pomanders. Here are some of the inspiration photos I used to help create a look for our day:
So, what does this teacher do on her spring break vacation? I'll catch you up with some highlights from this week, so far:
1. Catered cake and cupcakes to a child's 4th birthday party.
2. Completed Sacramento's Shamrock'n'Half-Marathon for the second time. However, this time I ran the race with my brother!
3. Went on a hunt for affordable and stylish men's gray suits for the groomsmen in our wedding (it was successful).
4. Finalized details with my florist for the wedding (and shaved over 700 bucks off our total!)
5. Slept in.
6. Created Save the Dates for our wedding.
7. Slept in.
8. Got back in touch with my crafty side...thanks to my free time!
9. Baked delicious salted caramel and banana cupcakes for my fiance's coworkers.
10. Slept in.
Next week, we are celebrating our 5-year anniversary! This will be our last anniversary together while dating! I'm super excited for the mini-vacation we have planned-- a road trip to Monterey/Carmel for a few days, down towards Santa Barbara, and finally to L.A. to visit my family....AND pick up my wedding gowns (eeek!!).
Anyway, I mentioned that I met with my wedding florist and finalized a lot of details. One of the things I love about the floral plans we have going on is the addition of whimsical, modern, and elegant pomanders. Here are some of the inspiration photos I used to help create a look for our day:
 |
| via |
 |
| via |
 |
| via |
 |
| via
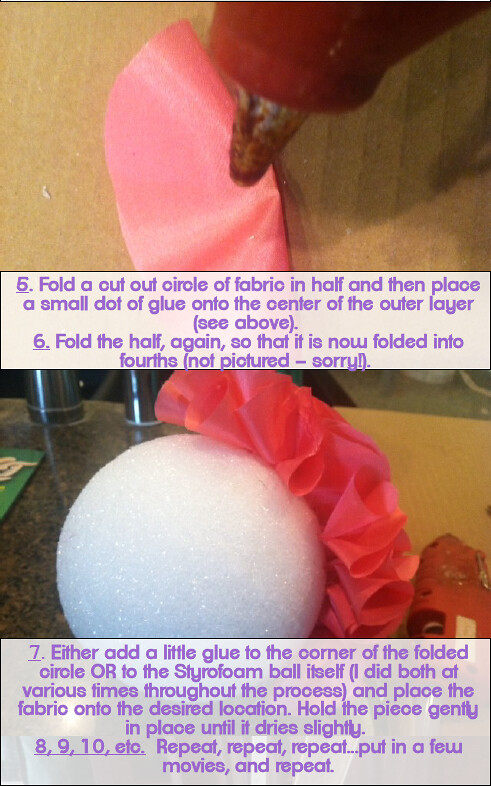
I wanted to add pomanders to the alter, very much like the first photo, and also have some on every other chair along the aisle. However, the cost of real flower pomanders is pretty high. I decided to add some lovely free flowing fabric to alter in a color that matches our scheme. To incorporate that style into the aisle, I thought I would take a stab at making silk flower pomanders. With time on my side this break, I figured I would make one and see how I liked it. I was a little hesitant to try them out at first since paper pomanders can look so tacky and cheap. I ended up liking the end result quite a bit...and so did my fiance! The trick is to make sure you use fabric that has some nice sheen to it and doesn't fray easy. I went with a silky feeling fabric that is typically used as lining inside garments (forgive me for not knowing the fabric name). Also, the whole thing took a while because I wanted to keep the "petals" close together. When they were spread apart, the pomander started to look like a loofa....uh no thanks.
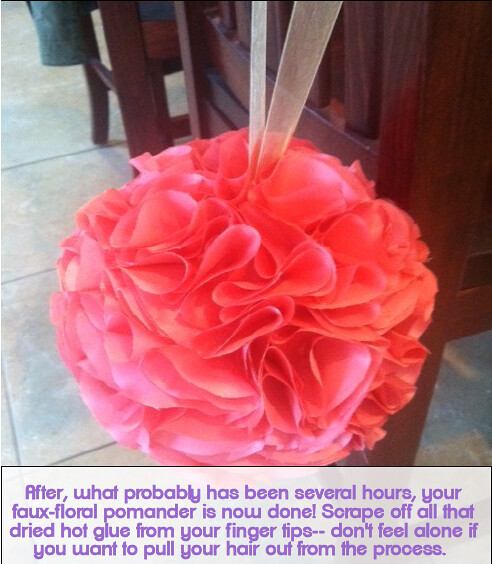
This is what my faux-floral pomander looks like:

The color is brighter in the photo than it really is. Actually, it's more of a deep rose shade of pink.
Here's a tutorial on how to make a silk flower pomander. It's time consuming, but not very difficult. To be honest, there are tons of these out on the web, but I thought it would be nice to start a DIY section on OMP!. Enjoy!
DIY Silk Flower Pomander
Materials:
-1 1/4 yard of fabric (go for something that has sheen to it and doesn't fray easily).
-pencil
-circular object or template approx 3-3.5" in diameter (for tracing)
-5" Styrofoam ball
-30" ribbon (this will end up making a 15" hang since you will be folding it in half; you can adjust this measurement to fit your desired length)
-good fabric cutting scissors
-hot glue gun and extra sticks
-covered work area (in case hot glue drips out)
-coffee & a good movie (for your sanity)
*Note: I used between 75-95 cut circle pieces. I tried to keep track, but um, between watching movies and groaning at the long process...I lost count. :)
|
Wednesday, March 7, 2012
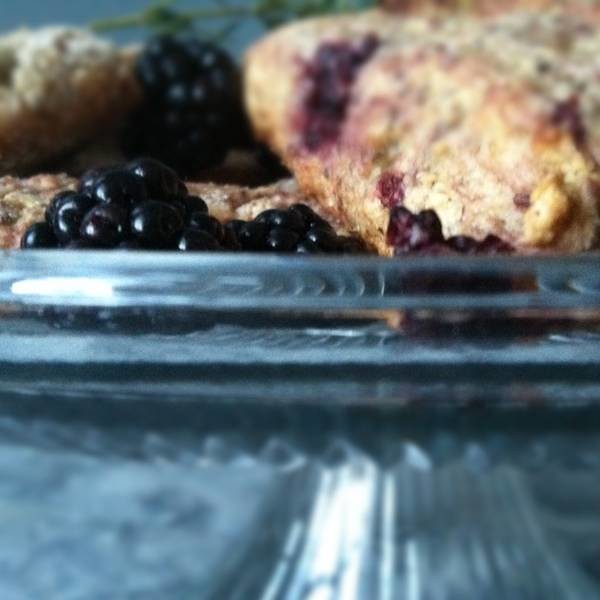
Blackberry, Lemon, and Thyme "Power" Scones
To My Dearest Friend,
I know how busy your weekdays can be. I've seen you stumble out of bed after hitting the snooze 3-4 times followed by a mad rush to get ready and make it out the door on time so you're not late for work. Don't think I've forgotten about how many times you forgot to eat breakfast on the way out because your protein shake blender was dirty, you didn't have time to make oatmeal, or you had some other lame excuse (like you had to take 5 minutes to curl your hair). When you do that I get into the craziest moods at around 9:00 A.M-- I'm sure you've heard me growl at you (I get cranky, okay?).
You'd think after a few days like that during the week, you'd learn to treat me right. However, munching on a slice of whole-wheat bread with almond butter just doesn't always cut it-- neither does your desperate attempt for protein and carbs with your slice of turkey in a wheat tortilla! Sustanance- smushtanance! I need something that satisfies my taste buds, keeps me full, and is good for me and the rest of the gang (your waist and thighs say, "Hi").
I hope by now, you see understand how awful this problem is. Well, I don't find it noble to complain without being proactive so, fortunately for you, I've provided you with a recipe for some Blackberry, Lemon, and Thyme "Power" Scones that are packed with protein, fiber, have plenty of "good" carbs, and are low in fat. They even have those chia seeds everyone has been talking about, which are supposed to be loaded with all kinds of nutrients your body can benefit from. Also, these scones taste delicious-- like summer in my mouth (well, your mouth), actually. Please make these today-- if you do, I'll see what I can do about not storing that ice cream you ate last night on your arms.
Yours Truly,
Belly


Blackberry, Lemon, and Thyme "Power" Scones
makes 1 dozen scones
2 cups whole wheat pastry flour
1 1/2 cups dark rye flour
1/2 cup chia seeds (grounding using a spice mill is optional)
3/4 cup brown sugar
1 tbsp baking powder
1 tsp salt
1 cup half and half
3/4 cup reduced fat buttermilk
1 1/2 tsp vanilla extract
3 tbsp lemon zest
2 tsp chopped fresh thyme leaves
6 oz fresh blackberries
1/4 cup raw sugar
Preheat oven to 350 degrees F and prepare two baking sheets with silicone liners or parchment paper.
1. Combine the whole wheat pastry flour, rye flour, chia seeds, brown sugar, baking powder, and salt in a large bowl. Combine the half and half, buttermilk, vanilla, lemon zest, and thyme in another bowl. Pour the wet mixture into the dry ingredients and stir until just partially combined.
2. Place the mixture onto a lightly floured surface. Flour your hands and knead it until the dough starts to form (it will be sticky). Flatten it out slightly and scatter 1/3 of the blackberries on top of the dough; gently fold and knead the dough again to combine-- repeat with the remaining berries.
3. Form the dough, with your hands, into a 10 x 6 inch rectangle. Cut it in half down the length and then in thirds across the width. Cut each square in half diagonally to make triangles-- you should get 12 triangles. Transfer the triangles to prepared baking sheets with about 2 1/2 - 3 inches of space between each. Brush the top of the scones with a little half and half; sprinkle raw sugar over the tops of each. Bake the scones for about 30 minutes and rotate the pan halfway through the baking time. Scones should be golden brown; remove and let cool on a rack before eating. Store in airtight container(s).
*These scones are best when eaten within 2 days of baking-- any longer and they will tend to try out.
Sunday, March 4, 2012
Sweet & "Sultry" Cupcakes
Carrot cupcakes with orange-ginger cream cheese frosting topped with fondant "panties" and trimmed with black lace for a lingerie themed bridal shower. Read more and see additional photos here.

Thank You, Bearded Owl's Hoot!
This post is a big, warm, and fuzzy "THANK YOU!" to Lisa Marie of Bearded Owl's Hoots. You may remember my "Wear What You Eat" post last year with the Ellie Eternity Scarf and a scrumptious strawberry cupcake. Well, when Lisa saw that I featured her shop and item on OMP!, she contacted me and offered to send me a complimentary scarf. She's so sweet!
I just received my Ellie Eternity Scarf in clover green with the most thoughtful note including a completely unnecessary apology for a delay in sending out the package-- seriously, Lisa is a doll!
Although, it's getting warmer, I can't help but want to wear my hand knit scarf around all the time! It's incredibly soft and it's incredible length makes a great statement scarf in addition to keeping your neck (and more) warm.
Maybe my AC will get some loving action so I can wear it more...anything for a cute accessory, right? ;)

Subscribe to:
Posts (Atom)